This is a Python script developed to facilitate planning and designing of biological experiments in Multi-well Plate setup, followed by automatically generating an input file for the Beckman Coulter Labcyte Echo® 525 Liquid Handler (used for automatic multi-well acoustic liquid transfer) to execute the planned experiments. The script has been developed keeping in mind the case of high-throughput cell-free transcription and translation (TX-TL) experiments, however, its usage can further be expanded to all kinds of high-throughput experiments utilizing the Echo Liquid Handler for automatic multi-well pipetting.
Conducting parallel experiments in research essentially saves a lot of time, as well as generates huge amounts of data to enhance the statistical significance of experimental results. Methods to increase the throughput of biological experiments have been widely accepted. However, it is important to keep track of the parallel experiments and organize it in a way that can be understood by others. An excel spreadsheet with a standard template could help the user organize and design their experiments. This template would allow the user to efficiently create complex experimental setups.
An issue with high-throughput biological experiments is the manual labor required for pipetting the reagents, which may sometimes lead to erroneous results. This is particularly harmful for experiments where the reaction volume is very low, for example, high-throughput cell-free TX-TL experiments. A method to automate the process of pipetting is the use of liquid handling robots such as the Beckman Coulter Labcyte Echo® 525 Liquid Handler, which can accurately and precisely transfer nanoliters of reagent across multi-well plates. The Echo software requires an input CSV file containing the information of volumes of reagent to be transferred from one well to another, which again is very laborious to create manually. Hence, we have developed an open-source python script to facilitate high-throughput experiment design as well as generating a CSV file compatible to the Echo software. An additional capability of this script is to output volume heatmaps in the microplate format for visual representation of the volume of reagents in each well.
Python functions from the two scripts in this module can be used for the following purposes:
| Description | Script Name | Function Called |
|---|---|---|
| Generates an Experiment Design template Output Filename: design_table.xlsx |
generate_blank_design_table.py | create_file(total_rows, total_columns, reagents) |
| Generates the Echo compatible CSV file Output Filename: setup_<date>.csv Generates a user-friendly CSV file carrying information about volume of reagents required in the source wells Output Filename: reagent_well_volumes.csv |
generate_echo_setup_file.py | echo_format(total_rows, total_columns, total_volume, volume_factor, max_volume, min_volume, design_file, [calculate_water, water_plate_name, *water_source_wells]) |
| Generates volume heatmaps in the microplate format for visual representation of the volume of reagents in each well Output Filename: <reagent>.png |
generate_echo_setup_file.py | input_heatmap(total_rows, total_columns, total_volume, volume_factor, design_file, [calculate_water, water_plate_name, *water_source_wells]) |
One can directly call the desired functions on the terminal from their corresponding Python scripts. However, more information regarding the arguments has been included within the scripts, and these scripts have been designed to be modulated as per the user's requirements.
A description on how to plan experiments using the Design table spreadsheet is given below.
The first step is to generate the design table template using the generate_blank_design_table.py script to plan the experiments. An empty design table will look like the following figure:
 |
|---|
| Figure 1: A snippet of an empty design spreadsheet (96 well-plate format) with 3 reagents in the experiment |
There are 5 major components in this template:
-
The Multi-well plate Grid : This is a 2-dimensional grid with dimensions as specified by the user. Each cell in the grid corresponds to a well on the plate. This is the area where volumes of liquid reagent to be dispensed in each well are entered. When the cell is blank, it means no dispensing operation is needed. Since the table is in an editable MS Excel format, one can explore options like "copy-paste", "Drag-down", "Autofill", etc to efficiently design the experiments.
One thing to keep in mind here for Echo based experiments is that the minimal droplet volume (25 nl for Beckman Coulter Labcyte Echo® 525 Liquid Handler) defines both the minimal value and the step volume size that the Echo can dispense. Hence it is important to enter values that are multiples of this minimum droplet volume.
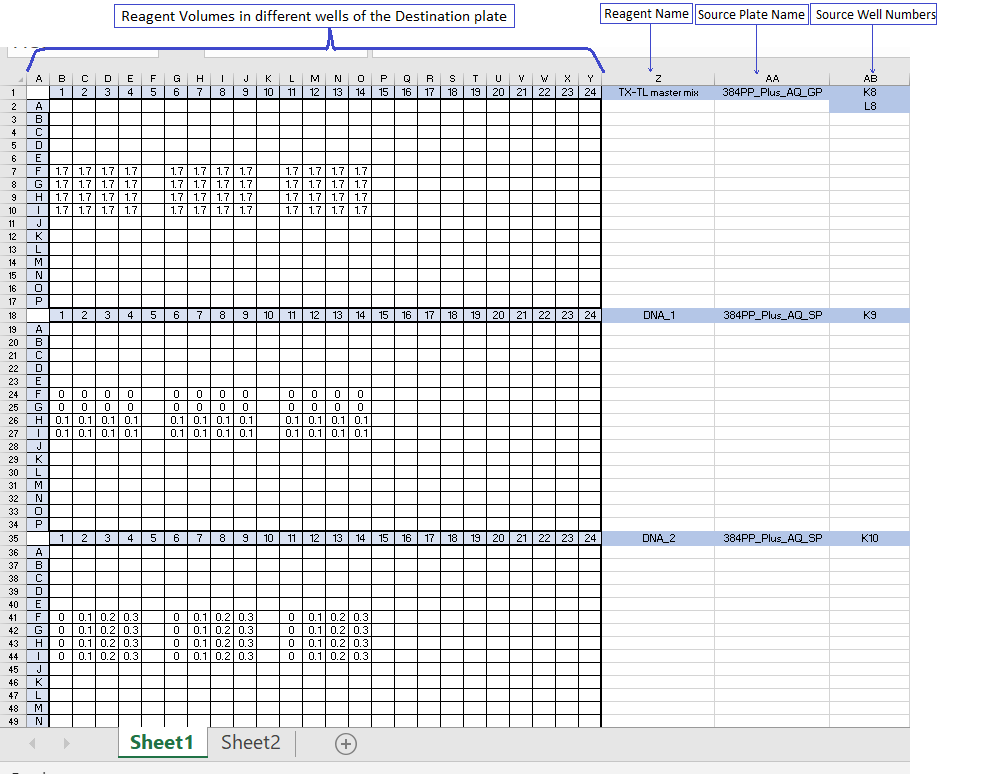
Also, one can fill volumes in any unit of measurement, however, it is important to keep in mind the scaling factor with respect to the nanoliter scale. (For example, in figure 3, the volumes have been entered in microliter units. So, the corresponding volume factor that needs to be specified is 1000 (see description of script #2 below). -
Reagent Name : This is the cell corresponding the first row of the grid and next column after the grid. In this cell, one must specify the name of the reagent. The volumes of this particular reagent to be dispensed in each of the wells need to be entered in the adjacent multi-well plate grid.
-
Source Plate Name : This is the cell adjacent to the reagent name. This entry is essential for using the Echo liquid dispenser. It helps the machine to identify the plate type and the liquid composition for accurate calibration from which the reagent has to be picked. More information about the Source Plate Types can be found on the official website of Labcyte.
Structure of source plate name: No. of wells + plate specs._liquid type_key feature_other features
Example 1: 384PP_AQ_BP (384-well+polypropylene _ aqueous_buffer) -
Source Well Number : This is the column adjacent to the source plate name. This entry is also essential for using the Echo liquid dispenser. It helps the machine to identify the well number from which the reagent has to be picked.
-
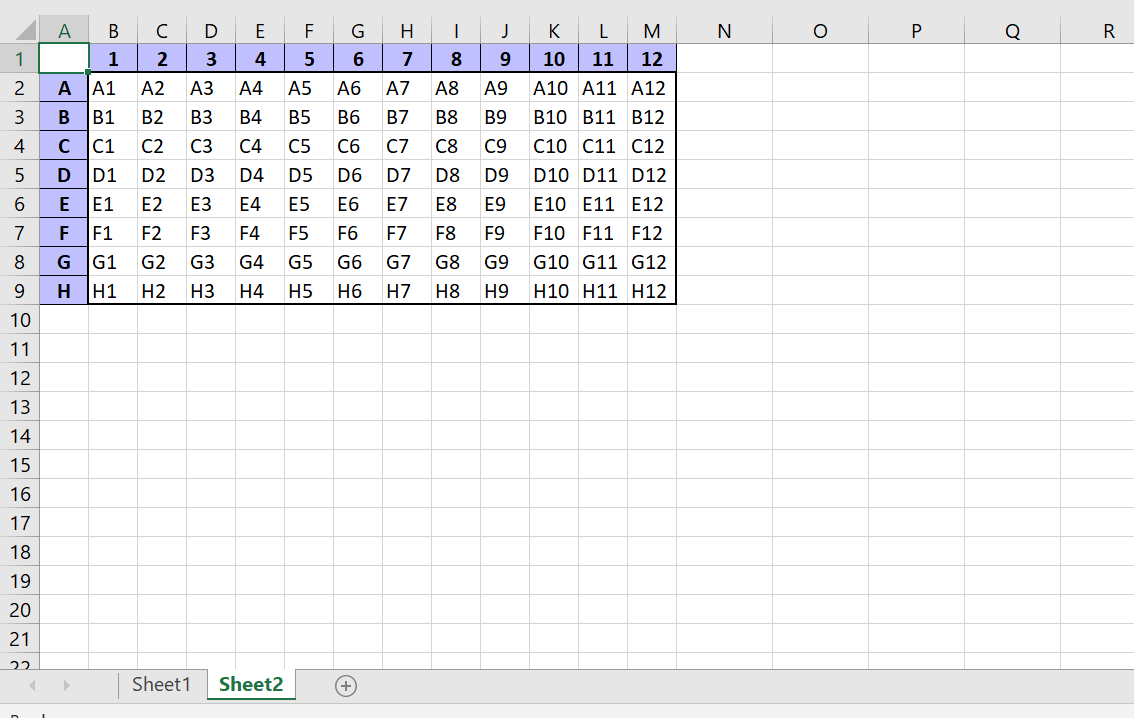
Sheet 2 : All the previous 4 components belong to Sheet 1 in the Excel file (see Figure 1). Sheet 2 in the Excel file carries information about the well numbers in the grid as it would be recognized by the machine. This Sheet would give an idea to the user about the well numbers and will facilitate experiment design. (See Figure 2)
 |
|---|
| Figure 2: A snippet of Sheet 2 of the Excel file (96 well-plate format) |
With the modular Python Script, one can practically generate any kind of multi-well plate template including most of the standard formats(48-wells, 96-wells, 384-wells, 1536-wells).
A filled 384 well plate design table will look like the following figure:
 |
|---|
| Figure 3: Example of a Completely filled design spreadsheet (384 well-plate format) with 3 reagents in the experiment |
An important thing to note over here is that if you have multiple source wells on the source plate for a particular reagent, please mention the well numbers one below the other in the same column (See the case of TX-TL master mix in Figure 3).
If you open this script on an IDLE, immediately after the import statements, you will see an assignment section in the Script (see Figure 4). Variables in this section can be assigned by the user before running the script as per requirements of the experiment.
 |
|---|
| Figure 4: generate_blank_design_table.py opened on PyCharm |
After completing the assignment, the user can directly run the script. In the end of the script, the function "create_file" has been called with the appropriate arguments. The desired Experiment Design template will be generated in the same directory as this Python file.
 |
|---|
| Figure 5: last two lines of generate_blank_design_table.py |
After generating the Design template, the user can plan their experiments according to the format described in the previous section. This design template shall be used as an input to the next script.
If you open this script on an IDLE, immediately after the import statements, you will see an assignment section in the Script (see Figure 6). Variables in this section shall be assigned before running the script.
 |
|---|
| Figure 6: generate_echo_setup_file.py opened on PyCharm |
Some of the variables are quite straightforward, however, some important points must be kept in mind while assigning values.
- Please double-check the name of the file before assigning it to the variable "design_file". Also make sure that the design file is in the same directory as the script, else assign the proper path of the file.
- "total_volume" is equivalent to the reaction volume in each well in nanoliters. If there is no fixed reaction volume in the experiment, the maximum volume limit for each well must be assigned to this variable.
- The script will be handling all volumes in nanoliters, so if you have entered values in the design table in some other scaling units, the scaling factor must be assigned to the variable "volume_factor". For example, if you have entered microliter volumes in the design table (like in the example in Fig. 3), volume_factor must be assigned to 1000. If you have entered nanoliter volumes in the design table, volume_factor must be assigned to 1.
- For the acoustic liquid transfer feature of Echo, there are certain volume constraints. For instance, for the Labcyte Echo® 525 Liquid Handler, each source well has a restricted volume contained between 20 μl and 65 μl. In other words, the input well cannot be filled with more than 65 μl and cannot dispense the liquid if it gets below 20 μl. The working volume is thus about 45 μl. And this varies with the different models of Echo and different source plates. Hence the volume constraints must be assigned to the variables "max_volume" and "min_volume".
- For experiments which have fixed reaction volumes (assigned to "total_volume"), the user may want the script to calculate the volume of water/buffer to make up the reaction volume (if not already calculated in the design table). If that's the case, the user can assign calculate_water = "yes" and assign the source plate name and source wells to variables "water_plate_name" and "water_source_well" respectively.
Please note that if there are multiple source wells for water, please mention them in a python list format to the variable "water_source_well".
*Python list format:
variable = ["well1", "well2", …. , "wellN"]
If you scroll to the end of the python script, you can see the two functions being called. I you want to call only one of the functions, you can do so by commenting the other function (adding a "#" in front of the function you don't want to call).
 |
|---|
| Figure 7: last two lines of generate_echo_setup_file.py |
Calling "echo_format" will generate 2 CSV files: setup_<date>.csv and reagent_well_volumes.csv. setup_<date>.csv is an Echo compatible CSV file. This file can directly be uploaded to the Echo software for automatic pipetting. reagent_well_volumes.csv is a user-friendly CSV file carrying information about volume of reagents required in the source wells (calculated based on the volume constraints of Echo as well as the total volume of reagent being pipetted.
Calling the "input_heatmap" function will generate volume heatmap images similar to the multi-well plate grid, but in a visually understandable, color-coded format instead of the numerical representation in the design table. The heatmap images can be used to describe the experiment design to peers and colleagues, and can be preserved for future designing as a visual representation of the volume of reagents in each well.
If you wish to run the script on your PC or Desktop, make sure you have the latest version of Python installed on your system (https://www.python.org/downloads/). The script has been developed using Python 3.8 (32-bit). Also, you might have to install openpyxl, pandas, XlsxWriter, seaborn, etc. in your environment or using the command line terminal. You can refer to the following links if you need help on installing packages/modules: https://packaging.python.org/tutorials/installing-packages/; https://docs.python.org/3/installing/index.html
If you are comfortable using the Command line you can directly call the desired functions on the terminal from their corresponding Python scripts with the respective arguments (follow the previous section for details regarding the arguments).
However, if you are more comfortable visualizing the code on a Python IDLE, you can use PyCharm (https://www.jetbrains.com/pycharm/download/), Spyder (https://www.spyder-ide.org/) or even the official IDLE that is automatically installed with Python. Using an IDLE will help the user to customize the script as required.