


Use a Linux machine to install Windows 10 or Windows 11 on a Raspberry Pi SD card.
Important
This repository is looking for a maintainer. I don't use wor-flasher personally, and I don't have the time to maintain it. If you use wor-flasher, and you can read and understand the script, please contact me somehow and I can grant you write privileges to the repository.
Tip
Consider the BVM project instead, especially on a Pi 4 or older.
BVM runs Windows 11 ARM64 in a KVM virtual machine alongside Linux instead of replacing it. Because networking, audio, and USB are passed through from the host, Wi-Fi and sound work out of the box - neither of which bare-metal Windows on a Raspberry Pi supports today. Microsoft's Prism emulator also lets x86 and x64 applications run.
It does not lift the Windows version ceiling. On hardware without ARMv8.1, such as the Pi 4 and older, BVM pins Windows 11 to build 22631.2861 for exactly the same CPU reason described in The ARMv8.1 limitation. No tool can work around that, since it is a property of the processor. BVM requires an ARM64 Linux with the kvm kernel module.
In 2020, this was flat-out impossible.
In 2021, this required following a complicated tutorial.
Now, using the new WoR-flasher, it's a piece of cake.
Get started · Find your Pi · Troubleshooting · Get help
- WoR-flasher
Windows images
- Downloads Windows 10 and Windows 11 ARM64 directly from Microsoft's update servers, so no copyrighted files are redistributed. See Is this legal?.
- Pick the newest release automatically, or choose an exact build number.
- Supports 37 languages, selectable at flash time.
- Import your own ARM64 ISO instead, via the
SOURCE_FILEvariable. - Extracted images are cached per build and language, so repeat flashes skip the lengthy download and image-generation step.
Hardware awareness
- Detects which Windows builds the target Pi can actually boot and hides the rest. See The ARMv8.1 limitation.
- Downloads the matching UEFI firmware and ARM64 drivers for the chosen model, newest release by default with pinned fallbacks.
- Injects the drivers into the Windows PE boot image automatically.
- Verifies every download against an upstream SHA1 or SHA256 hash.
Flashing
- Creates either an installation drive that installs Windows onto itself, or a recovery drive that installs onto other disks. See Choosing a drive.
- Customizes
config.txtfor overclocking or display tweaks via theCONFIG_TXTvariable. - Optionally downloads everything to a RAM disk to spare your SD card, using More RAM from Pi-Apps.
Interfaces
- Graphical wizard (
install-wor-gui.sh) and terminal interface (install-wor.sh). - Fully scriptable through environment variables, including a
DRY_RUNmode. - Sourceable as a library of shell functions for use in larger scripts.
- Self-updates from GitHub on each run, unless
NO_UPDATE=1is set.
WoR-flasher runs on a Linux machine and flashes a drive that you then move to a Raspberry Pi. The table below is about the computer running the flasher, not the Pi.
| Host operating system | CLI | GUI | Notes |
|---|---|---|---|
| Raspberry Pi OS (32 or 64-bit) | Yes | Yes | The only system upstream tests against |
| Debian, Ubuntu, Linux Mint and other Debian-based distros | Yes | Yes | ARM or x86_64. The CLI works over a terminal or SSH; the GUI works on desktop sessions with yad and a supported terminal emulator such as GNOME Terminal |
| Fedora, Arch, openSUSE and other non-Debian Linux | No | No | Dependencies are installed with apt, and installed packages are detected by reading the dpkg database |
| macOS | No | No | The CLI and GUI now fail early with a clear message, but the flashing backend still requires Linux block-device and filesystem tools such as lsblk, findmnt, parted, mkfs.fat, mkfs.exfat, mount.exfat-fuse, modprobe and /sys |
| Windows | No | No | Requires Linux block-device and filesystem tooling |
| Windows with WSL2 | No | No | WSL2 does not expose removable drives by default, so assume it does not work |
You also need:
sudoaccess, for partitioning and mounting the target drive- About 10 GB of free space in the download directory, for the Windows image and the files extracted from it
- A target drive of at least 8 GB. See Choosing a drive
- A desktop session if you want the graphical interface, since it needs
yadand a terminal emulator. Ubuntu Desktop's default GNOME Terminal is supported. The terminal interface works over SSH - A Raspberry Pi 2 v1.2, 3, 4, 400, or 5 to run Windows on
Warning
Flashing erases the target drive completely. Botspot (the developer of this tool) cannot be held responsible for data loss.
| Pi model | CPU | Architecture | Newest Windows 11 that boots | End of support | Notes |
|---|---|---|---|---|---|
| Pi 2 v1.2 / Pi 3 / CM3 | Cortex-A53 | ARMv8.0 | 23H2 (22631.x) |
November 11, 2025 | Windows 10 recommended |
| Pi 4 / Pi 400 | Cortex-A72 | ARMv8.0 | 23H2 (22631.x) |
November 11, 2025 | RAM limited to 3 GB by default |
| Pi 5 | Cortex-A76 | ARMv8.2 | 25H2 and newer | October 12, 2027 | No Windows drivers yet |
CPU and architecture data from the Raspberry Pi processor documentation. Support dates from Microsoft Lifecycle.
Important
Windows 11 builds newer than 25163 cannot run on the Pi 3 or Pi 4. Those builds make extensive use of the atomic instructions introduced in ARMv8.1, which the Cortex-A53 and Cortex-A72 do not implement.
The symptom is distinctive: the Pi reaches the UEFI splash screen normally, then hangs with no error message the moment the bootloader hands off to Windows. In practice this means 23H2 (22631.x) is the newest retail release that works, since 24H2 is build 26100. The Pi 5's Cortex-A76 is ARMv8.2 and is unaffected.
WoR-flasher enforces this automatically. When the target is a Pi 3 or Pi 4, incompatible builds are hidden from the version menus, get_bid returns the newest build that will actually boot, and flashing aborts with an explanation if an incompatible build is supplied via the BID variable. The cutoff is controlled by the ARMV80_MAX_BUILD variable.
Source: Windows on Raspberry FAQ, "Does Windows 11 work?" - build 25163 is documented there as the last one that boots on the Pi 4 and older.
End-of-support dates in the table are for the newest bootable build, Home and Pro editions. Enterprise and Education editions are supported longer. If you run Windows 10 instead, its support ended October 14, 2025.
Source: Windows 11 and Windows 10 lifecycle pages, and the Enterprise and Education equivalent.
Warning
Every Windows version a Pi 3 or Pi 4 can run is now past end of support and no longer receives security updates. This is fine for an experimental or offline machine, but worth knowing before putting one on a network you care about.
WoR-Flasher cannot debloat the OS. Performance is about the same either way, but there will be extra preinstalled apps you must remove manually if you want them gone.
Windows on a Raspberry Pi relies on a community driver package rather than vendor drivers, so a fair amount of hardware is unavailable or degraded. Find your model below.
Note
The RPi-Windows-Drivers project was archived in February 2025 and is read-only. Version 0.17 is the final release, so these tables are final too. See the status page for the full per-device breakdown.
Cortex-A53, ARMv8.0. Newest bootable Windows: 23H2 (22631.x), though Windows 10 is recommended on this hardware.
| Hardware | Status | Notes |
|---|---|---|
| Onboard Ethernet | Working | LAN9514 on the Pi 3 B, LAN7515 on the Pi 3 B+ |
| Wi-Fi | Not working | No driver exists for the CYW43438 or CYW43455 chips |
| Bluetooth | Partial | Bus speed is limited because hardware flow control is not exposed, and the driver may crash |
| USB 2.0 | Working | |
| SD card | Working | |
| Display | Working | Basic frame buffer only, no acceleration |
| GPU / 3D acceleration | Not working | The driver loads but is unfinished, so 3D and WebGL do not work |
| HDMI audio | Not working | No driver available |
| Analog audio jack | Working | |
| GPIO, SPI, I2C, PWM, UART | Working | |
| CSI camera module | Not working | No driver available |
| 7-inch DSI touch screen | Partial | The display works but the resolution may be wrong, and touch input does not |
| 3-pin case fan | Partial | The UEFI can switch it on, but it never switches off |
Source: RPi-Windows-Drivers status page, Raspberry Pi 3 (ARM64) section.
Cortex-A72, ARMv8.0. Newest bootable Windows: 23H2 (22631.x).
| Hardware | Status | Notes |
|---|---|---|
| Onboard Ethernet | Working | Broadcom GENET gigabit controller |
| Wi-Fi | Not working | No driver exists for the CYW43455 chip |
| Bluetooth | Working | |
| USB 2.0 | Partial | The OTG controller requires RAM limited to 1 GB |
| USB 3.0 | Partial | UASP is disabled so USB 3.0 drives can boot, which significantly reduces transfer speeds |
| SD card | Partial | The eMMC2 controller lacks DMA, HS200/HS400 and UHS-I |
| Display | Working | Basic frame buffer only, no acceleration |
| GPU / 3D acceleration | Not working | The driver loads but is unfinished, so 3D and WebGL do not work |
| HDMI audio | Partial | The HDMI0 port only, which is the one next to the USB-C connector |
| Analog audio jack | Working | |
| GPIO, SPI, I2C, PWM, UART | Working | |
| CSI camera module | Not working | No driver available |
| 7-inch DSI touch screen | Partial | The display works but the resolution may be wrong, and touch input does not |
| 3-pin case fan | Partial | The UEFI can switch it on, but it never switches off |
Source: RPi-Windows-Drivers status page, Raspberry Pi 4 / 400 (ARM64) section. Firmware from pftf/RPi4.
The UEFI firmware limits the Pi 4 to 3 GB of usable RAM by default, regardless of whether your board has 4 GB or 8 GB. This is a conservative default, not a permanent restriction.
You can change it whenever you like - before installing Windows, or at any point after setup has finished. The setting lives in the UEFI firmware rather than in Windows, so it persists across reboots and changing it never requires reinstalling.
To use the full amount of RAM:
- Keep pressing ESC after plugging in the power cord, until you see the UEFI setup screen.
- Go to
Device Manager→Raspberry Pi Configuration→Advanced Configuration. - Change
Limit RAM to 3 GBtoDisabled. - Press ESC several times to go back, then Y to save when prompted, and reboot.
See the Windows on Raspberry FAQ for details, under "Only 3 GB of RAM are available. How can I fix this?".
Note
On the Compute Module 4, USB support requires a RAM limit, so leave this setting enabled there.
Cortex-A76, ARMv8.2. The only model that can run Windows 11 24H2 and newer.
There are no drivers at all. WoR-flasher injects a placeholder file purely so the installer will boot, so assume nothing in the tables above applies.
| Hardware | Status | Notes |
|---|---|---|
| Everything | Not working | No driver package exists for the Pi 5 |
| USB to Ethernet adapter | Working | The only practical way to get networking |
SD card boot seems more reliable than USB on this model. The WoR developers have stated they no longer offer support for Raspberry Pi boards, so this is unlikely to change.
Source: worproject/rpi5-uefi, which provides the Pi 5 firmware, and the Windows on Raspberry FAQ.
Neither works on any model and neither is coming. BVM runs Windows in a VM where the Linux host owns the hardware, so Wi-Fi, audio and USB are passed through and work normally.
Source: BVM. Note that BVM pins the Pi 4 to build 22631.2861 for the same CPU reason described above, so it does not raise the Windows version ceiling.
The size of the drive you flash determines what it can do:
| Drive size | What it can do |
|---|---|
| 25 GB or larger | Installation drive - can install Windows onto itself |
| 8 GB to 25 GB | Recovery drive - can only install Windows onto other drives larger than 16 GB |
| Under 8 GB | Too small to be usable |
WoR-flasher detects this from the selected drive. If the drive is 25 GB or larger, the terminal and graphical interfaces ask whether to make a self-installing drive or a recovery drive. Smaller usable drives automatically use recovery mode.
The fastest way to get WoR-flasher running on a RPi is by using the Pi-Apps app store for Raspberry Pi:

Installing WoR-flasher from Pi-Apps has several advantages: it creates a convenient button in the Start menu, uninstalling takes one click, and updates are handled seamlessly.
git clone https://github.com/Botspot/wor-flasherThis will download the scripts to a new directory named wor-flasher.
Dependencies: No need to install packages manually on supported Debian-based systems. Running the script will automatically install these: yad aria2 cabextract wimtools chntpw genisoimage exfat-fuse exfatprogs or exfat-utils, wget, udftools, bc, parted, dosfstools, unzip, and git.
install-wor.sh is self-contained, so you can fetch just that file and run it:
mkdir -p ~/wor-flasher && cd ~/wor-flasher
wget https://raw.githubusercontent.com/Botspot/wor-flasher/main/install-wor.sh
chmod +x install-wor.sh
./install-wor.sh
Important
This only works for the terminal interface. install-wor-gui.sh cannot be downloaded on its own - it needs install-wor.sh, terminal-run and several images beside it, and exits with "No script found named install-wor.sh" if they are missing. Use git clone for the graphical interface.
Do not pipe either script into bash. curl ... | bash fails, because the script needs to know its own directory and exits with "Failed to determine the directory that contains this script". It also means nobody reads the code before it runs parted, mkfs and dd on a drive.
When importing an ISO, use an official Windows ARM64 image. The script accepts media containing either sources/install.wim or sources/install.esd; customized Windows images are not supported.
Automatic source-checkout updates are disabled by default so a run always uses the revision you reviewed. To opt in for a clean Git checkout, run it with NO_UPDATE=0; otherwise update deliberately with git pull. A single-file copy has no Git repository, so re-download it when you want a newer version.
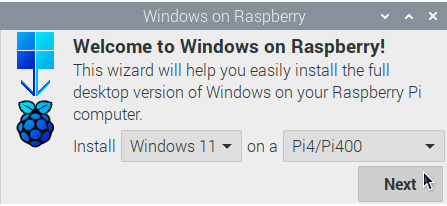
~/wor-flasher/install-wor-gui.sh- Choose a Windows version and choose which Raspberry Pi model will be running it.
- Choose a language for Windows.

- Plug in a writable storage device to flash Windows to.

- See Choosing a drive for what each size can do.
- Double-check that everything looks correct before clicking the Flash button.

- A terminal will launch and run the
install-wor.shscript:

Note: this can take a lot of time to download individual files from Microsoft, compress them, and generate a Windows image. Fortunately, subsequent runs can skip the lengthy image-generating step if the ISO file exists. - If all goes well, the terminal will close and you will be told what to do next.

~/wor-flasher/install-wor.shExample terminal walkthrough (click to expand)
$ ~/wor-flasher/install-wor.sh
Choose Windows version:
1) Windows 11
2) Windows 10
3) More options...
Enter 1, 2 or 3: 1

Choose language: en-us

Choose Raspberry Pi model to deploy Windows on:
1) Raspberry Pi 5
2) Raspberry Pi 4 / 400
3) Raspberry Pi 3 or Pi2 v1.2
Enter 1, 2, or 3: 2

Available devices:
/dev/sdb - 59.5GB - USB Storage
Choose a device to flash the Windows setup files to: /dev/sdb

1) Create an installation drive (minimum 25 GB) capable of installing Windows to itself
2) Create a recovery drive (minimum 8 GB) to install Windows on other >16 GB drives
Choose the installation mode (1 or 2): 1

Input configuration:
DL_DIR: /home/pi/wor-flasher-files
RUN_MODE: cli
RPI_MODEL: 4
DEVICE: /dev/sdb
CAN_INSTALL_ON_SAME_DRIVE: 1
BID: 22631.2861
WIN_LANG: en-us

Using UEFI firmware: https://github.com/pftf/RPi4/releases/download/v1.52/RPi4_UEFI_Firmware_v1.52.zip
Formatting /dev/sdb
Generating partitions
Generating filesystems
# script output continues... It generates a Windows image legally, downloads all necessary drivers, the BIOS, the bootloader, and the modified kernel. Once done it ejects the drive.The GPU firmware never handed off to the UEFI firmware. Usually one of:
- Mismatched firmware files.
RPI_EFI.fd,start4.elf,fixup4.dat, the.dtbfiles, and theoverlays/folder must all come from the same UEFI release. Hand-copying only some of them causes this. Re-flash rather than patching files individually. - Outdated firmware. Newer Pi 4 board revisions need a recent UEFI release. WoR-flasher downloads the latest release by default.
- Outdated bootloader EEPROM. Update it with Raspberry Pi Imager (
Misc Utility Images→Bootloader).
The green ACT LED blink pattern narrows it down: 3 blinks means start4.elf was not found, 4 blinks means it failed to launch, and 7 blinks means RPI_EFI.fd was not found.
If ESC works at the splash but the system hangs once the countdown finishes, the firmware is healthy and the hang is in the handoff to Windows. Check in this order:
- The Windows build is too new. This is by far the most common cause on a Pi 3 or Pi 4. See The ARMv8.1 limitation.
- System Table Selection is not ACPI. Go to
Device Manager→Raspberry Pi Configuration→Advanced Configurationand make sure it is set toACPI. Windows cannot boot from a Device Tree handoff. - Secure Boot is enabled. Check
Device Manager→Secure Boot Configurationand disable it.
UEFI stops accepting keystrokes once the boot countdown expires, so a keyboard that seems dead is often just a system that has already moved on. Start tapping ESC the instant power is applied.
If it genuinely does not respond, use a wired keyboard plugged directly into a USB 2.0 port with no hub, and unplug all other USB devices. Wireless dongles and keyboards with built-in hubs frequently fail to enumerate in UEFI.
There are two independent boot-order mechanisms in play, and it's important to know which one this is:
- The Raspberry Pi bootloader's
BOOT_ORDER- lives in the Pi board's own SPI EEPROM, not on the SD card. It just decides which media (SD, USB, network) to search forstart4.elf/RPI_EFI.fdon, and is unaffected by flashing or swapping SD cards. - The UEFI firmware's own Boot Manager
BootOrder/Boot####NVRAM - this is the "Boot Manager Menu" screen withUEFI PXEv4,UEFI Shell, etc. It is emulated by thepftf/RPi4(or Pi 3/5 equivalent) firmware in a variable-store file that lives on the SD card's boot partition itself, so it travels with the card. This is what decides whether "Windows Boot Manager" or the network options get tried first, and it's the one that matters here.
install-wor.sh/install-wor-gui.sh never touch either of these - they only copy files (Windows install files, drivers, and the UEFI firmware binaries) onto the drive. Neither script calls efibootmgr, bcfg, or anything else that edits NVRAM. The "Windows Boot Manager" entry is added automatically by Windows Setup itself, the first time it actually runs on the Pi (via bcdboot, during the WinPE stage), not by anything on the flashing machine.
About ejecting the freshly-flashed card and moving it into the Pi: that's the normal, expected flow and is safe by itself - the script already syncs and unmounts/ejects before it exits. The part that actually matters is what happens after that, on the Pi itself:
- First boot from the card starts the WinPE-based installer, which partitions/applies the Windows image, then automatically reboots several times (WinPE → Windows Setup → specialize → OOBE) before Windows is actually installed and registers its own boot entry.
- If the SD card is removed, swapped for a different card, or the Pi is powered off partway through that automatic reboot sequence, the "Windows Boot Manager" entry never gets written to that card's variable store, and you're left with only the firmware defaults (network/shell) - exactly the symptom described here.
- Let the whole process run to completion (watch it over HDMI, or serially per Getting more detail) before assuming the card is done and swapping anything.
If Windows is confirmed already installed on the drive (bootmgfw.efi exists at EFI/Microsoft/Boot/bootmgfw.efi on the boot partition) but the entry is still missing, check in this order:
- The drive is not connected, or not connected at boot time. Make sure it is plugged in and powered before applying power to the Pi, not after.
- The wrong drive was flashed, or the last flash failed partway through. Re-run
install-wor.shagainst the correct/dev/sdXdevice and let it finish completely; check its output for errors instead of assuming it succeeded. - The ESP (first partition,
bootpart) is missing or unreadable. It must containEFI/BOOT/BOOTAA64.EFI. Mount the drive's first partition on another Linux machine and confirm the file is present - if not, re-flash. - The firmware's own
BootOrder/Boot####NVRAM entries were edited or lost, e.g. inBoot Maintenance Manager, or because Windows Setup was interrupted as above. Enter the UEFI setup (keep tapping ESC at power-on) →Boot Maintenance Manager→Boot Options→Add Boot Option, point it atEFI\Microsoft\Boot\bootmgfw.efion the boot partition, then move it above the PXE/HTTP entries inChange Boot Orderand save. - Outdated bootloader EEPROM, same as the rainbow-screen cause above - update it with Raspberry Pi Imager.
Expected on a Pi 4. See The 3 GB RAM limit.
The generated config.txt already sets enable_uart=1 and uart_2ndstage=1, so serial debugging needs no changes. Connect a USB-TTL adapter to GPIO 14 (TX), GPIO 15 (RX), and GND, at 115200 baud, to see exactly where boot stops.
The install-wor.sh script is designed to be used within other, larger bash scripts. For automation and customization, install-wor.sh will detect and obey certain environment variables.
Setting BID, WIN_LANG, RPI_MODEL, DEVICE or CAN_INSTALL_ON_SAME_DRIVE suppresses the matching interactive prompt, which is what makes unattended runs possible. Interactive runs auto-detect the selected drive's capacity: drives under 8 GB are refused, 8-25 GB drives use recovery mode, and 25 GB+ drives let you choose between self-install and recovery mode.
| Variable | Default | Description |
|---|---|---|
BID |
prompts | An exact Windows version ID. Example: 22631.2861 |
WIN_LANG |
prompts | Language for the Windows image. Example: en-us |
RPI_MODEL |
prompts | Target Raspberry Pi model. Allowed values: 3, 4, 5 |
DEVICE |
prompts | The device to flash. Example: /dev/sda |
CAN_INSTALL_ON_SAME_DRIVE |
prompts | Optional automation override. Set to 1 to install Windows onto the selected 25 GB+ drive, or 0 to make a recovery drive for another >16 GB drive |
DL_DIR |
~/wor-flasher-files |
Where components and Windows images are downloaded |
SOURCE_FILE |
none | Path to an existing Windows ARM64 ISO to use instead of downloading one. Must be at least 3 GB and end in .iso or .ISO |
CONFIG_TXT |
firmware default | Replaces config.txt on the resulting drive, commonly for overclocking or HDMI settings. This is the firmware's own default. The GUI supplies its own per-model version |
RUN_MODE |
cli |
Set to gui to display graphical error messages |
USE_CACHE |
0 |
Controls reuse of downloaded components. 0 deletes them and downloads again every run, 1 reuses them only while they are still the newest version, 2 reuses them without checking for updates |
DRY_RUN |
unset | Set to 1 to run the whole setup but exit after downloading, without flashing |
SKIP_PACKAGE_INSTALL |
0 |
Internal test-runner override. Set to 1 only after dependencies have already been installed by the test container |
CONFIG_TXT replaces the UEFI config.txt on the resulting drive. The GUI starts with a model-specific default, including the settings needed for UEFI and serial diagnostics. Keep those settings unless you know why they need to change. Refer to the official Raspberry Pi config.txt documentation for supported options.
An unstable overclock can prevent the Pi from booting. Power it off, put the drive back in a Linux host, then reduce or remove the overclock entries from its config.txt. The GPU is not used by Windows on Raspberry Pi, so GPU overclocking has no meaningful benefit.
These Pi 4 examples are starting points, not guarantees. Board cooling, power supply quality, and silicon variation determine the stable limit. Add only the lines from one example below to the generated Pi 4 configuration.
# Conservative Pi 4 overclock: 2.147 GHz CPU
over_voltage=6
arm_freq=2147
gpu_freq=300
# Higher Pi 4 overclock: 2.3 GHz CPU
arm_freq=2300
gpu_freq=300
over_voltage=14
force_turbo=1Do not treat extreme settings as a general recommendation. Start conservatively, test for stability, and ensure adequate cooling before raising voltage or frequency.
These have working defaults and rarely need changing.
| Variable | Default | Description |
|---|---|---|
UEFI_USE_LATEST |
1 |
Download the newest UEFI firmware release from GitHub. Set to 0 to use the pinned version instead. Pre-releases are never selected, since upstream uses them to mark known-bad builds |
UEFI_VER_PI3 |
v1.39 |
Pinned UEFI version, used when UEFI_USE_LATEST=0 or GitHub is unreachable |
UEFI_VER_PI4 |
v1.52 |
Pinned UEFI version, used when UEFI_USE_LATEST=0 or GitHub is unreachable |
UEFI_VER_PI5 |
v0.3 |
Pinned UEFI version, used when UEFI_USE_LATEST=0 or GitHub is unreachable |
DRIVERS_USE_LATEST |
1 |
Download the newest ARM64 driver release from GitHub. Set to 0 to use the pinned version instead |
DRIVER_VER |
v0.17 |
Pinned driver package version, used when DRIVERS_USE_LATEST=0 or GitHub is unreachable. The upstream project is archived, so this is the final release |
PE_USE_LATEST |
1 |
Download the newest WoR PE-based installer from worproject.com. Set to 0 to use the pinned package instead |
PE_INSTALLER_URL |
v1.1.0 asset | Pinned PE installer URL, used when PE_USE_LATEST=0 or worproject.com is unreachable |
PE_INSTALLER_SHA256 |
v1.1.0 hash | Expected SHA256 of the pinned PE installer. The download is always verified, either against this value or against the live hash when using the latest package |
ARMV80_MAX_BUILD |
25163 |
The last Windows build that boots on an ARMv8.0 Pi. Higher builds are hidden and rejected for the Pi 3 and Pi 4 |
ARMV80_SAFE_BID |
22631.2861 |
The build suggested when a user picks an incompatible one for a Pi 3 or Pi 4 |
WIN11_MIN_BUILD |
22000 |
The build number at which a release counts as Windows 11 rather than Windows 10 |
WIN10_OLDEST_BUILD |
17134.112 |
Marks the end of the Windows 10 section of worproject.com's version list |
EXAMPLE_BID |
22621.525 |
The example build number shown in prompts |
VERIFY_TLS |
1 |
Verify TLS certificates when downloading. Set to 0 only if your system has an outdated CA bundle and downloads fail with certificate errors |
NO_UPDATE |
0 |
Set to 1 to skip the self-updater |
UPDATE_REPO_URL |
https://github.com/Botspot/wor-flasher |
Repo the self-updater compares against to decide if an update exists. Only affects the check itself - git pull still uses the local checkout's own configured remote, typically origin |
UPDATE_REF |
HEAD |
Branch/ref on UPDATE_REPO_URL to compare the local commit against |
Example usage:
DL_DIR=/media/pi/my-big-flash-drive DEVICE=/dev/sdg DRY_RUN=1 BID=22631.2861 RPI_MODEL=4 WIN_LANG=en-us ~/wor-flasher/install-wor-gui.shThe install-wor.sh script is designed to be used within other, larger bash scripts. For improved integration, install-wor.sh is equipped with a variety of useful functions that frontend scripts like install-wor-gui.sh can use.
To source the script so the functions are available:
source ~/wor-flasher/install-wor.sh sourceQuestion: why does that command say "source" twice? Answer: The first "source" is a command, and the second "source" is a command-line flag that is passed to the script to let it know you are sourcing it.
Once the script is sourced, these functions become available:
| Function | Purpose |
|---|---|
error |
Print an error message and exit with code 1 |
status, echo_green, echo_red |
Print colored progress, success and failure messages |
resolve_path |
Resolve a path using GNU or BSD-compatible tools |
require_linux_host |
Stop early on unsupported non-Linux hosts |
get_file_size |
File size in bytes |
sha1_file, sha256_file |
Hash a file with GNU or BSD-compatible tools |
package_available |
Test whether an apt package exists in the repositories |
install_packages |
Install a space-separated list of apt packages |
download_from_gdrive |
Download a large publicly shared file from Google Drive |
get_partition |
Resolve a partition device node from a drive and partition number |
get_device_name |
Human-readable manufacturer and model for a drive |
get_size_raw |
Drive size in bytes |
drive_capability |
Classify a drive as too small, recovery-only, or install-capable |
get_space_free |
Free space in a folder, in bytes |
cache_is_current, mark_cache |
Check and stamp downloaded component caches |
list_devs |
Colored list of drives that can be flashed |
detect_root_dev |
Detect the Linux block device backing the current root filesystem |
list_langs |
Supported Windows language codes and names |
list_bids |
Available Windows build IDs from the catalog |
get_bid |
Newest Windows build ID the target Pi can actually boot |
cpu_supports_bid |
Whether the target Pi's CPU can run a given build |
list_bids_supported |
Build list filtered to what the target Pi can boot |
get_os_name |
Human-readable OS name from a build ID |
setup |
Run host checks and install Linux dependencies |
The most commonly reused functions are documented in detail below.
error- a simple function that Botspot uses in bash scripts to warn the user that something failed and to exit the script with a failure code. (1)
Input: string containing the error message
Usage:
command-that-downloads-windows || error "Windows failed to download! Check your internet connection and try again."echo_greenandecho_red- announce the success or failure of an action in colored text.statusprints blue progress text.
Input: string containing message
Usage:
status "Now, downloading windows... please wait"
echo_green "Done"
echo_red "That did not work, but it is not fatal"package_available- Determines if a package is possible to install from the apt repositories Input: one name of a package Usage:
if package_available yad ;then
  echo "yad can be installed"
fiinstall_packages- Checks for and installs a quoted list of packages.
Input: string containing a space-separated list of packages
Usage:
install_packages 'yad aria2 cabextract wimtools chntpw genisoimage exfat-fuse exfatprogs wget parted dosfstools unzip git'download_from_gdrive- Downloads a publicly shared large-file from Google Drive. Here's the tutorial I adapted it from. Inputs: File ID, output filename
Usage:
download_from_gdrive 1WHyHFYjM4WPAAGH2PICGEhT4R5TlxlJC WoR-PE_Package.zipget_partition- A clean, reliable way to determine the block-device of a partition.
Input: block device of drive, partition number
Usage:
get_partition /dev/sda 2
#Assuming partition 2 exists, the above command returns "/dev/sda2"

get_partition /dev/mmcblk0 2
#Assuming partition 2 exists, the above command returns "/dev/mmcblk0p2"

get_partition /dev/mmcblk0 all
#Returns every partition within the drive, each one on a lineget_device_name- Determine a human-readable name for the given storage drive.
Input: block device of drive
Usage:
get_device_name /dev/sdaget_size_raw- Determines the size of a drive in bytes.
Input: block device of drive
Usage:
get_size_raw /dev/sdalist_devs- list available storage drives in a human-readable, colored format.
Usage:
list_devsget_bid- Get the latest Windows build ID for either Windows 10 or Windows 11 that the target Raspberry Pi can actually boot. WhenRPI_MODELis "3" or "4", builds requiring ARMv8.1 are skipped.
Input: "10" or "11" Usage:
get_bid 11cpu_supports_bid- Exit 0 if the target Pi's CPU can run the given build, otherwise exit 1. Depends onRPI_MODELbeing set.
Input: build ID
Usage:
if cpu_supports_bid 26100.1742 ;then
  echo "this build will boot"
filist_bids_supported- Same aslist_bids, but omits builds the target Pi cannot run.
Input: "10" or "11"
Usage:
list_bids_supported 11get_os_name- Get human-readable name of operating system.
Input: valid Windows build ID
Usage:
get_os_name 22631.2861This code will non-interactively flash Windows 11 to /dev/sda and add overclock settings. You can copy and paste the code into a terminal, or save this as a shell script.
#make all variables we set to be visible to the script (only necessary if you run this in a terminal)
set -a

#First, source the script so its functions are available
source ~/wor-flasher/install-wor.sh source

#Determine the latest Windows 11 update ID using a function
BID="$(get_bid 11)"

#set destination RPi model
RPI_MODEL=4

#choose language
WIN_LANG=en-us

#set the device to flash
DEVICE=/dev/sda

#set a custom config.txt
CONFIG_TXT="over_voltage=6
arm_freq=2147
gpu_freq=750

# don't change anything below this point #
arm_64bit=1
enable_uart=1
uart_2ndstage=1
enable_gic=1
armstub=RPI_EFI.fd
disable_commandline_tags=1
disable_overscan=1
device_tree_address=0x1f0000
device_tree_end=0x200000
dtoverlay=miniuart-bt"

#indicate that drive is large enough to install Windows to itself
CAN_INSTALL_ON_SAME_DRIVE=1

~/wor-flasher/install-wor.shThis repository is looking for a maintainer, so contributions are genuinely welcome.
Important
install-wor.sh does not update its source checkout automatically. For a clean Git checkout only, you can opt in to the updater with NO_UPDATE=0; it skips the update when tracked files have uncommitted changes:
NO_UPDATE=0 ~/wor-flasher/install-wor.shUseful when testing changes:
| Command | Purpose |
|---|---|
./tests/run-tests.sh |
Run the automated suite; on non-Linux hosts it uses Docker for Linux integration when available |
./tests/run-linux-integration.sh |
Run only the privileged Ubuntu-container integration path, useful for debugging Docker setup |
./tests/run-tests-gui.sh |
Run the GUI walkthrough test with Linux/display/yad preflight |
./tests/run-tests.sh --walkthrough |
Create fake drives, then step through the terminal interface by hand |
./tests/run-tests.sh --gui |
Same, but launch the graphical interface |
./tests/run-tests.sh --full |
Include the real multi-gigabyte Windows image download |
./tests/run-tests.sh --clean |
Remove the test workspace and detach its loop devices |
tests/test-lib.sh |
Shared test output helpers used by the test entrypoints |
bash -n install-wor.sh |
Check syntax without running anything |
DRY_RUN=1 ... |
Run the whole flow but stop before touching the drive |
USE_CACHE=1 ... |
Reuse downloaded components so iterations are fast |
DEBUG=1 ./terminal-run ... |
Print which terminal emulator was selected |
The harness needs Linux loop devices and passwordless sudo for the integration tests. On Linux, ./tests/run-tests.sh creates loopback drives directly. On non-Linux hosts, the same command tries Docker and runs the integration suite inside a privileged Ubuntu container; if Docker is missing or unavailable, it reports a skip instead of failing. The container uses /tmp/wor-flasher-test-workspace, so loop devices, downloads and caches disappear with the container unless you explicitly pass --keep to the inner harness. The GUI walkthrough has its own wrapper, ./tests/run-tests-gui.sh, which skips cleanly without a Linux desktop display and yad. The harness detects the newest bootable build for each model from the catalog, so no build number is hardcoded.
GitHub Actions runs ShellCheck on every shell entrypoint and a focused Ubuntu dry-run integration job with TEST_MODELS=4. That keeps pull requests covered without downloading the full Windows image or exercising every Raspberry Pi firmware package on every push.
Both installer scripts are plain Bash with no build step. install-wor-gui.sh sources install-wor.sh for its functions, so shared installer logic belongs in the latter. Test entrypoints share reporting helpers through tests/test-lib.sh.
Yes. All proprietary Windows components are downloaded straight from Microsoft's update servers using uupdump. Consider reading this debate that took place on the Raspberry Pi Forums. At the conclusion of the thread, Raspberry Pi employees confirm that WoR is completely legal. The OS is unlicenced just like a regular Windows ISO, which can be activated via an activation key or by logging in with a pre-licensed Microsoft account.
This repository does not currently contain a LICENSE or COPYING file, which means the code defaults to exclusive copyright. Botspot's related projects, Pi-Apps and BVM, are both GPL-3.0. Adding a license here is a decision for the copyright holder.
| Problem with | Where to go |
|---|---|
| The WoR-flasher tool | Open an issue or the Botspot Software Discord |
| Windows on Raspberry (the OS itself) | Email the WoR developers or join their Discord |
WoR-flasher automates a process built by other people. It would not exist without:
| Project | By |
|---|---|
| Windows on Raspberry and its PE-based installer | Mario Bălănică and contributors |
| RPi-Windows-Drivers | worproject |
| UEFI firmware for the Pi 3 and Pi 4 | Pete Batard and the pftf project |
| UEFI firmware for the Pi 5 | worproject |
| uupdump | The UUP dump team |
| WoR-flasher, Pi-Apps and BVM | Botspot |
Everything WoR-flasher downloads at runtime, and every external fact stated in this README, comes from the following.
Components downloaded during a flash
| Source | Used for |
|---|---|
| worproject.com ESD catalog | Windows 10 and 11 ARM64 images, served from Microsoft's update servers |
| WoR PE-based installer | The installer environment injected into boot.wim |
| pftf/RPi4 | UEFI firmware for the Pi 4 and Pi 400 |
| pftf/RPi3 | UEFI firmware for the Pi 3 and Pi 2 v1.2 |
| worproject/rpi5-uefi | UEFI firmware for the Pi 5 |
| RPi-Windows-Drivers | ARM64 device drivers, archived at v0.17 |
Reference material
| Source | Used for |
|---|---|
| Windows on Raspberry FAQ | The ARMv8.1 build cutoff, the 3 GB RAM limit, Pi 5 support status |
| RPi-Windows-Drivers status page | Every per-model driver table |
| Windows 11 Home and Pro lifecycle | Windows 11 end-of-support dates |
| Windows 10 Home and Pro lifecycle | Windows 10 end-of-support date |
| Windows 11 Enterprise and Education lifecycle | Extended support dates |
| Windows Processor Requirements | Supported processor lists per Windows release |
| Raspberry Pi processors | CPU cores and architecture per model |
| Raspberry Pi config.txt | config.txt option reference |
| uupdump | Windows image generation, referenced in Is this legal? |
| Pi-Apps | Recommended install method and the More RAM add-on |
| BVM | The recommended alternative for Wi-Fi and graphics acceleration |