HTML & CSS
Thursday, July 27, 2017 3:13 PM
<p> - para
<a> - Anchor tag/link <a href="https://www.w3schools.com">This is a link</a>
<img> - Image  <img src="w3schools.jpg" alt="W3Schools.com" width="104" height="142">
<br> - break
<h1> to <h6> - headings
<hr> - horizontal rule/line
<pre> - preformatted text - fixed width font
-
Book marks -
<h2 id="C4">Chapter 4</h2>; then <a href="#C4">Jump to Chapter 4</a> OR <a href="html_demo.html#C4">Jump to Chapter 4</a>-- from another page -
Tables -
<table> element to define a table
 <tr> element to define a table row
<td> element to define a table data
 <th> element to define a table heading
- Lists -
<ul> element to define an unordered list
<ol> element to define an ordered list
<li> element to define a list item
CSS property float:left or display:inline to display a list horizontally
- Grouping Tags: A block-level element always starts on a new line and takes up the full width available
<div>        Defines a section in a document (block-level)
<div style="background-color:black;color:white;padding:20px;">
  <h2>London</h2>
<p>London is the capital city of England.</p> </div>
<span>        Defines a section in a document (inline) EX; <h1>My <span style="color:red">Important</span> Heading</h1>
- Class attribute makes it possible to define equal styles for elements with the same class name. See right for ex.
- iframe is used to display a web page within a web page -
<iframe src="URL" height="200" width="300"></iframe> - The
<script>tag is used to define a client-side script (JavaScript). <script> element either contains scripting statements, or it points to an external script file through the src attribute. - The
<base>element specifies the base URL and base target for all relative URLs in a page. Ex;<base href="https://www.w3schools.com/images/" target="_blank"> - HTML5 Semantic Elements
<header> - Defines a header for a document or a section
<nav> - Defines a container for navigation links
<section> - Defines a section in a document
<article> - Defines an independent self-contained article
<aside> - Defines content aside from the content (like a sidebar)
<footer> - Defines a footer for a document or a section
<details> - Defines additional details
<summary> - Defines a heading for the <details> element
Attributes: title - Will display as tooltip when coded in para tag
href - stores the actual link alt - alternate text to be used style - Specifies an inline CSS style for an element Ex; --> this is inline CSS id - Specifies a unique id for an element
Formatting:
<b> - Bold text
<strong> - Important text
<i> - Italic text
<em> - Emphasized text
<mark> - Marked text
<small> - Small text
<del> - Deleted text
<ins> - Inserted text
<sub> - Subscript text
<sup> - Superscript text
- An internal CSS is defined in the section of an HTML page, within a
<style>element:
<html>
<head>
<style>
body {background-color: powderblue;}
h1   {color: blue;}
p    {color: red;}
</style>
</head>- External CSS: It is always recommended to use this method
<head>
  <link rel="stylesheet" href="styles.css">
And the file will contain code like above internal css example
- To define a specific style for one special element, add an id attribute to the element:
<p id="p01">I am different</p>
#p01 {     color: blue; }
- Within the css file we can define the attributes like this :
body{
  background-color: #f4f4f4;
  color:green;
  font-family: Verdana;
  font-size: 16px;
  font-weight: normal;
}- To define individual styles we can use class for specific tags. For example we can wrap elements within a div and assign a class.
<div class=“box-1”></div>. Then in the css we can define class attributes as:
.box-1{
Color: blue;
}- We can also define styles for specific tags within a class as class name followed by tag name. Ex: In this example these styles will apply only to h1 tags within the div using that class.
	.box-1 h1{
		font-name: Tacoma;
		color: green;
}- Similarly to provide global styles to any tag we can directly define it with the tag type. Ex: Like below for link tag i.e.
<a></a>
	a{
		text-decoration: none;  // to remove underline for link
	}
	// based on states we can set styles like this
	a:active{
		color:green;
}- To target specific types of tags within a form for example, we can define the class style like this - In this example the style applies only to the form elements that have type as ‘input’.
	.my-form input[type=“input”]{
		padding:8px;
}-
Box model for an element can be represented like this 
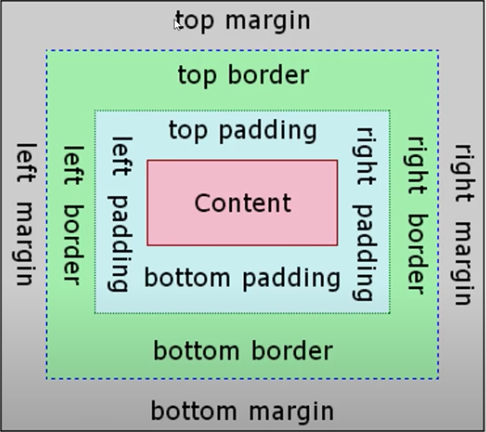
-
Use CSS float property to let the element float to the right or to the left of a text img { float: left; }
<p><img src="pineapple.jpg" alt="Pineapple" style="width:170px;height:170px;margin-right:10px;"> -
The clear property lets specifies what elements can float beside the cleared element and on which side. The clear property can have values: left - No floating elements allowed on the left side, right- No floating elements allowed on the right side
-
If an element is taller than the element containing it, and it is floated, it will overflow outside of its container. Then we can add overflow: auto; to the containing element to fix this problem: .clearfix { overflow: auto; }
-
Setting styles to specific instances of a list is referred as pseudo classes and useful in case of dynamically generated lists. For instance if we have an unordered list with n elements we can target specific elements as follows. .my-list li:first-child{} —> For 1st child .my-list li:last-child{} —> For last list item .my-list li:nth-child(5){} —> For 5th item .my-list li:nth-child(even){} —> For even items
<head>
<style>
div.cities {
    background-color: black;
    color: white;
    margin: 20px 0 20px 0;
    padding: 20px;
}
</style>
</head>
<body>
<div class="cities">
<h2>London</h2>