Java
Ecosystem
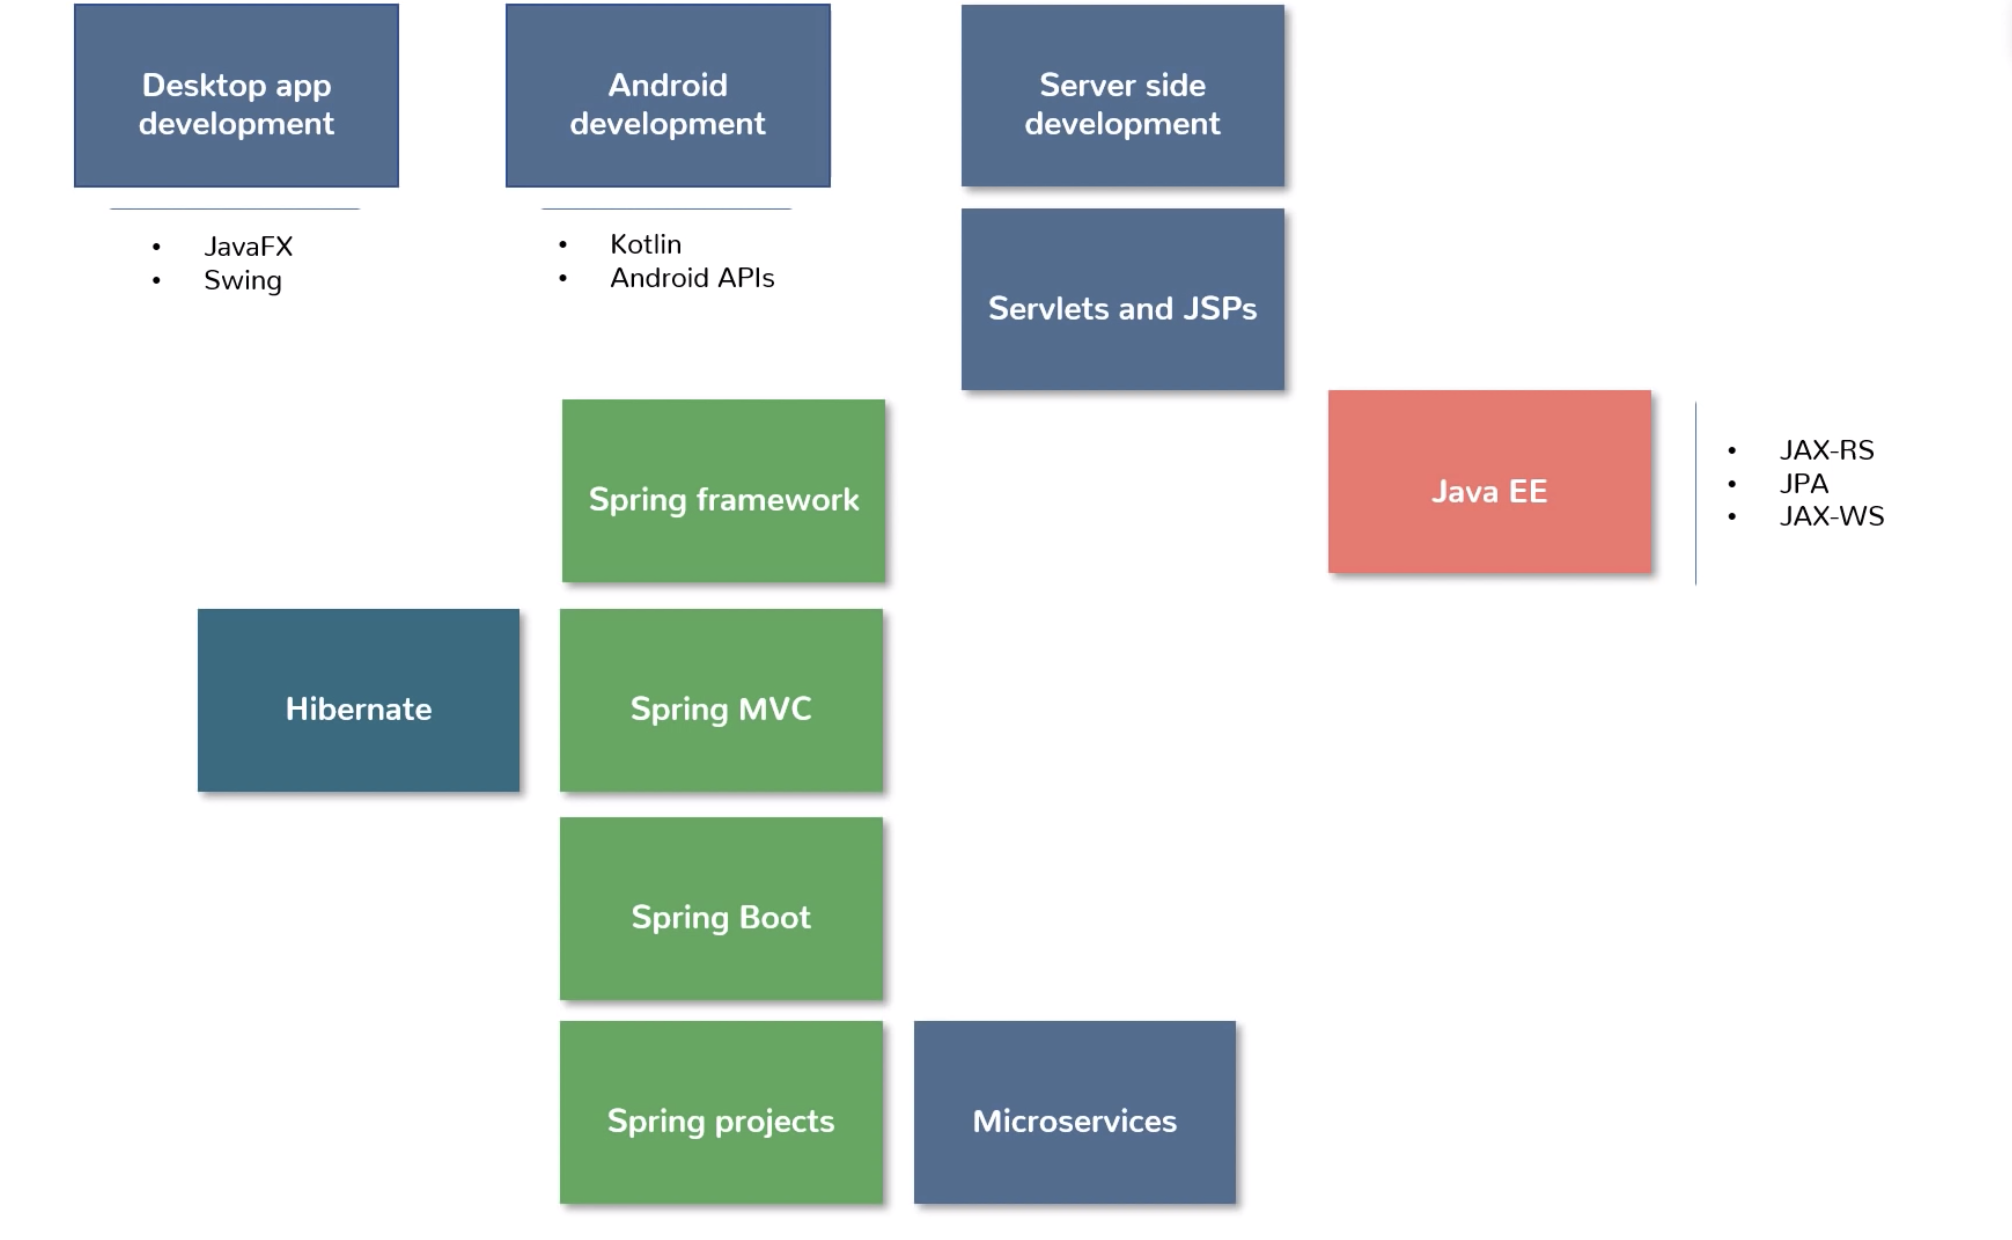
Access Levels
| Modifier | Class | Package | Subclass (diff pkg) | World |
|---|---|---|---|---|
| public | Y | Y | Y | Y |
| protected | Y | Y | Y | N |
| no modifier | Y | Y | N | N |
| private | Y | N | N | N |
Abstract Class vs Interface
- Abstract class gives a way to define common base implementation that child class can use while interface defines a blue print that child class should strictly follow.
- Like a class, an interface can have methods and variables, but the methods declared in an interface are by default abstract (only method signature, no body).
- Interfaces specify what a class must do and not how.
- Variables in interface are final, public and static.
- We can’t create instance(interface can’t be instantiated) of interface but we can make reference of it that refers to the Object of its implementing class.
-
A class can implement more than one interface. It is called multiple inheritance. Ex:
public class ClarkKent Implements Human, SuperHuman - A class that implements interface must implements all the methods in interface.
- An abstract class is also good if we want to declare non-public members. In an interface, all methods must be public.
- If we want to add new methods in the future, then an abstract class is a better choice. Because if we add new methods to an interface, then all of the classes that already implemented that interface will have to be changed to implement the new methods.
- Changing abstract class by adding new methods doesn’t affect child classes but changing interface will impact all child classes that implement it.
- If the functionality we are creating will be useful across a wide range of disparate objects, use an interface. Abstract classes should be used primarily for objects that are closely related, whereas interfaces are best suited for providing a common functionality to unrelated classes.
  interface In1
  {
  final int a = 10;
  void display();
  }

  class TestClass implements In1
  {
  // Implementing the capabilities of
  // interface.
  public void display()
  {
  System.out.println("Geek");
}- Abstract class can have abstract and non-abstract methods.
- An abstract class may contain non-final variables.
- Abstract class can have final, non-final, static and non-static variables. Interface has only static and final variables.
- An interface can extend another Java interface only, an abstract class can extend another Java class and implement multiple Java interfaces.
- From Java 8, interfaces can be updated to add default methods without affecting existing classes that already implement the interface. To do this we need to define the new method as default. Ex:
default void printMsg(String msg) { //do something }
Static Class & Methods:
- Static keyword can be used with class, variable, method and block.
- Non-static variables and methods are specific to the obj whereas Static members belong to the class instead of a specific instance, so you can access it without an object. Ex:
static void myMethod() { //do something; }Ex2: if we have instantiated a class and then set variables like color = ‘Brown’ then this is a non-static var. - This method can now we accessed directly inside another method as myMethod() whereas non-static methods need an object instantiation and then referenced as obj.myMethod().
- Another important difference is that with Static methods, it is compile time binding and hence a method cannot be overridden in the sub class whereas in dynamic binding this can be done.
- Static methods can only access class variables whereas non static can access both static and non-static vars.
- Its not a good practice to access static vars and methods using obj reference or access non-static with class reference. Ex.
Dog d = new Dog(); d.bark()—> not recommended since bark() is static so shudnt be accessed like this but instead simply as bark(). - A class can be made static only if it is a nested class.
Polymorphism Method overridding (run time polymorphism) & overloading (compile time poly). When a class has more than one methods with the same name but different number, sequence or types of arguments then it is known as method overloading. Overloading - Defining/overloading methods to do different things based on the input. Ex:
class Overload {
  void demo (int a) {
    System.out.println ("a: " + a);
  }
  void demo (int a, int b)  {
    System.out.println ("a and b: " + a + "," + b);
  }
  double demo(double a) {
    System.out.println("double a: " + a);
    return a*a;
  }
}

class MethodOverloading {
  public static void main (String args []) {
  Overload Obj = new Overload();
  double result;
  Obj .demo(10);
  Obj .demo(10, 20);
  result = Obj .demo(5.5);
  System.out.println("O/P : " + result);
  }
}
Encapsulation Wrapping of the data and code together is known as encapsulation. Basically data elements within a class are marked as private and can be accessed only via getter and setter methods.
SOLID Principle Is an acronym for the first five object-oriented design(OOD)** principles**. These principles, when combined together, make it easy for a programmer to develop software that are easy to maintain and extend.
- S - Single-responsiblity principle - A class should have one and only one reason to change, meaning that a class should have only one job.
- O - Open-closed principle - Objects or entities should be open for extension, but closed for modification. This simply means that a class should be easily extendable without modifying the class itself.
- L - Liskov substitution principle - every subclass/derived class should be substitutable for their base/parent class. Ex: If office class extends building, even if we pass office objects to the methods of building class it wud still work.
- I - Interface segregation principle - A client should never be forced to implement an interface that it doesn't use or clients shouldn't be forced to depend on methods they do not use.
- D - Dependency Inversion Principle - Entities must depend on abstractions not on concretions. It states that the high level module must not depend on the low level module, but they should depend on abstractions.
Generics
-
<T>is a generic and can usually be read as "of type T". Defines the type. - In situations where we do not know the type upfront or want a generic type to support many types we can use the type as T. EX:
public static <T> List <T> arrayToList(T[] array) {}— In this example we can use this method to support multiple array types like string, Int etc. - Wildcards in generics - Use
<? extends obj>or<? super obj>to define List types that support subclass types. Ex:static void printBuildings(List<? extends Building> buildings) {}— here the wildcard will let us pass buildings of class type Building as well as subclasses of Building. - Similarly
<? super T>lets us assign elements of the super class of T. Ex:List<? super Integer> foo3 = new ArrayList<Number>();// Number is a superclass of Integer
Functional Programming & Lambdas:
- Function interface allows to define functions as variables.
Function<T, R>. T is the input type and R is the return type -
Function<Integer, Integer> myFunc = TestClass::func;—> Assigns the TestClass’s func method to my Func. - To invoke this do —>
myFunc.apply(5);(5 is the input to the func)
- In Java, Lambda is similar to an arrow function in JS.
- Main adv is that it enables functional programming in Java vs Object oriented. In OOP to execute any code it needs to be within a class and method. Lambdas simplify this. Lambdas also enable passing behaviors (i.e. Methods) as opposed to passing only objects in OOP.
- A simple lambda function is defined as:
Addition addLambda = (a, b) -> a + b;Here the type ‘Addition’ is an interface that has the method signature for this function. Ex:
  interface Addition {
    int sum (int x, int y) { } ;
}- The interface should have exactly only 1 abstract method and the lambda should exactly match the signature. This type of interface is called a functional interface. In Java 8, functional Interfaces can now support multiple default non-abstract methods (implemented methods) but should have exactly 1 abstract method that should match the lambda function.
- Function interfaces are recommended to have
@FunctionalInterfaceannotation so that its easy to recognize and compiler will also flag errors when someone mistakenly adds more than 1 abstract method to it. - To execute the lambda we need to call the interface method on it, just as if it were an instance of a class. Ex:
addLambda.sum(2,3); - Inline class definition of an interface is also called an anonymous class. Ex:
  Addition addClass = new Addition() {
    public int sum(int a, int b) {
      return a + b;
    }
  }
addClass.sum(4,5);- Instead of having to declare a separate interface to define lambdas we can use built in interface function
Function<T,R>as shown at the beginning. - There are other built-in interface functions like
- Predicate - which takes in one param and returns boolean,. Ex:
Predicate<Integer> isEven = (x) -> x%2 ==0; - UnaryOperator - takes one param and returns param of the same type,
- BinaryOperator - takes two param and returns one param of the same type, Ex:
BinaryOperator<Integer> getSum = (acc, x) -> acc +x; - BiFunction<T, U, R> - takes 2 params and returns a result of same type,
- Supplier, Consumer etc. Refer this for more info - http://tutorials.jenkov.com/java-functional-programming/functional-interfaces.html
- Predicate - which takes in one param and returns boolean,. Ex:
- Passing functions as arguments - Simply define a method that takes a func as an input and then execute apply on the passed func. EX:
  public static Integer execFunc(Function<Integer, Integer> mathFunc) {
    return apply(mathFunc)
}- Higher order functions - Wrapping a function with additional behavior. Ex: Wrapping a function that does math logic with additional validation so that the inner function is only responsible for the math.
Array vs ArrayList -
- Array is fixed length that is set at initialization.
- Ex:
String arr[] = new String[3]or simplyString arr[] = {“item1” , “item2”};. Array members can be accessed only using []. - ArrayList is dynamic in size, part of collection framework and provides a host of methods to manipulate the array. Ex:
ArrayList<Integer> arr = new ArrayList<Integer>(2);thenarr.add(5); - Convert Array to an array list like this —
List<String> list1 = Arrays.asList(array name);
List - represents an ordered sequence of objects, Each element in a Java List has an index. You can add any Java object to a List. If the List is not typed, using Java Generics, then you can even mix objects of different types (classes) in the same List.
Types of List are ArrayList, LinkedList, Vector, Stack.
Ex: List listA = new ArrayList(); or List<MyObject> list = new ArrayList<MyObject>(); //uses generics
To insert - listA.add(“value”).
To get - listA.get(0);
Linked List -
- Similar to ArrayList but has reference to the previous and next elements. So uses more memory
- Can be instantiated as
LinkedList<String> my list = new LinkedList(); - Add and get are similar to how it works for an ArrayList. But its useful when adding elements in between as it automatically rearranges the rest of the elements in the list.
- Use when there is a need to add a lot of elements in between the list
Stacks & Queues -
- Queues are usually implemented with linked lists, whereas stack can be implemented on its own Ex:
Queue<String> q = new LinkedList();
Stack<String> deckOfCards = new Stack();
- Priority queue is a type of queue where the order of items is based on a priority. By default elements are ordered according to the natural ordering, or by a Comparator provided at queue construction time. Ex:
  PriorityQueue<Integer> pq = new PriorityQueue<Integer>();
  pq.add(“abcd”);
  pq.add(“1234”);
pq.add(“23bc”);- When printed this queue will contain elements in the following order - 1234, 23bc, abcd
- If we need custom ordering we need to implement Comparator like
  Queue<Integer> testIntegersPQ = new PriorityQueue<>(new CustomIntegerComparator());
  static class CustomIntegerComparator implements Comparator<Integer> {
  @Override
    public int compare(Integer o1, Integer o2) {
      return o1 < o2 ? 1 : -1;   // descending and o1 > o2 ? 1 : -1 for ascending
    }
  };

//  Or just simply:
  Queue<Integer> testIntegersPQ = new PriorityQueue<>((n1, n2) -> n2 - n1); //——Max heap
Set
- Represents a collection of objects where each object in the Java
Setis unique. In other words, the same object cannot occur more than once in a Java Set. This is the major difference from a list. The second difference between a Java Set and Java List interfaces is, that the elements in a Set has no guaranteed internal order. The elements in a List has an internal order, and the elements can be iterated in that order. - Types of sets are EnumSet, HashSet, LinkedHashSet, TreeSet.
- LinkedHashSet differs from HashSet by guaranteeing that the order of the elements during iteration is the same as the order they were inserted into the LinkedHashSet.
- TreeSet also guarantees the order of the elements when iterated, but the order is the sorting order of the elements.
Ex:
Set setA = new HashSet();orSet<MyObject> set = new HashSet<MyObject>(); - Insert and get are same like above.
- To iterate the elements of a Set using an Java Iterator, you must first obtain an Iterator from the Set using
iterator()method or using For-Each. Other option is to use stream API (see below). - Sorted Set - The Java SortedSet interface behaves like a normal Set with the exception that the elements it contains are sorted internally. This means that when you iterate the elements of a SortedSet the elements are iterated in the sorted order. The Java Collections API only has one implementation of the Java SortedSet interface - the
java.util.TreeSetclass. - Tree Set -
- TreeSet implements the SortedSet interface. So, duplicate values are not allowed.
- Objects in a TreeSet are stored in a sorted and ascending order.
- TreeSet does not preserve the insertion order of elements but elements are sorted by keys.
Map -
- The Java Map interface, represents a mapping between a key and a value. Once stored in a Map, you can later look up the value using just the key.The Java Map interface is not a subtype of the Collection interface.
- Types - HashMap, Hashtable, EnumMap, IdentityHashMap, LinkedHashMap, Properties, TreeMap, WeakHashMap.
- LinkedHashMap maintains insertion order. This is configurable by passing diff arguments while defining it. EX:
LinkedHashMap<String, String> myMap = new LinkedHashMap<>(4, 0.75f, false) - In the example above, the 1st arg defines the initial size of the map; 2nd arg defines the % beyond which the size needs to be expanded…in this case we tell it to expand once 75% of original size is reached; 3rd arg of false indicates that insertion order is to be preserved…if we pass true then the order is based on access time i.e. oldest accessed element is first and latest is last
Ex: -
Map<String, MyObject> map = new HashMap<String, MyObject>(); - Insert -
map.put(“key1”, “value1”); - Get -
String element1 = map.get("key1");// get() method returns a Java Object, so we have to cast it to a String or whatever the type is. But if we specified generic type like Map<String, String> then type casting isn’t needed. - Other useful methods -
map.containsKey,map.containsValue - Iteration - WE can iterate through keys like this -
  Map<String, String> map = new HashMap<>();
  for(String key : map.keySet()) {
    String value = map.get(key);
}-
Another method is to use streams. Ex:
Stream<String> stream = map.keySet().stream(); -
To iterate through values instead of keys just replace
keySet()withvalues(). -
To get complete set of key and value we can use
entrySet(). Ex:for( Map.Entry<String, String> entries : map.entrySet())and then refer it asentries.getKey()orentries.getValue() -
Sorted Map - The Java SortedMap interface, is a subtype of the java.util.Map interface, with the addition that the elements stored in a Java SortedMap map are sorted internally. This means you can iterate the elements stored in a SortedMap in the sort order. Java comes with a built-in implementation of the Java SortedMap interface called TreeMap
HashMap vs Hashtable - HashMap is non-synchronized. This means if it’s used in multithread environment then more than one thread can access and process the HashMap simultaneously. Hashtable is synchronized. It ensures that no more than one thread can access the Hashtable at a given moment of time. The thread which works on Hashtable acquires a lock on it to make the other threads wait till its work gets completed. HashMap allows one null key and any number of null values while Hashtable doesn’t allow null key or values. If there is a need of thread-safe operation then use Hashtable.
- Varargs - Similar to array destructuring in JS where the type can be represented with 3 dots. Ex: public static void printList(String… items) {}
- The Java Stream API provides a functional approach to processing collections of objects.
- There are many ways to obtain a stream from a collection and one of them is the
stream() method.
  List<String> items = new ArrayList<String>();
  items.add("one");
  items.add("two");
  items.add("three");
Stream<String> stream = items.stream();-
Another method is using the method called
of()which can be used to create a Stream from one or more objects. example -Stream<String> streamOf = Stream.of("one", "two", "three"); -
Terminal & Non-terminal operations - A non-terminal stream operation is an operation that adds a listener to the stream without doing anything else. A terminal stream operation is an operation that starts the internal iteration of the elements, calls all the listeners, and returns a result.
-
Non-terminal - transform or filter the elements in the stream. When you add a non-terminal operation to a stream, you get a new stream back as result. Ex; filter(), map(), flatMap(), distinct() etc.
-
Terminal - The terminal operations of the Java Stream interface typicall return a single value. Once the terminal operation is invoked on a Stream, the iteration of the Stream and any of the chained streams will get started. Once the iteration is done, the result of the terminal operation is returned. Ex;anyMatch(), allMatch(), noneMatch(), collect(), count(), forEach()
-
Hence we need a terminal operation like collect() to trigger the iterations if we are using non-terminal operations.
-
Collect is in some ways similar to reduce where it takes a function to convert a stream to a collection. Collectors is a built in functions that has a few methods that can be used OOTB such as Collectors.toList() - converts stream to a list, toSet(), joining() - joins all items in a stream to a singular type like a string, counting(), groupingBy() - We need to pass a function and the result will be a Map with the Key as the count and value as list of items; partitioningBy() - similar to join but the result is a Map with 2 partitions.
-
Parallel Streams - Use parallelStreams() method instead of streams() and Java internally runs each stream operation as a separate thread that can greatly improve performance
-
Composition - A way of combining multiple smaller functions into a more complex functions. The functions that we are combining should have compatible input & output type I.e. output type of first fn should be same as the input type of the 2nd.
-
Composition can be accomplished using ‘compose’ or ‘andThen’. EX:
  Function<Integer, Integer> timesTwo = x -> x * 2;
  Function<Integer, Integer> minusOne = x -> x - 1;
  Function<Integer, Integer> timesTwoMinusOne = minusOne.andThen(timesTwo);
System.out.println(timesTwoMinusOne.apply(10));- flatMap() - is the combination of a map and a flat operation i.e, it first applies map function and than flattens the result. Ex:
  List<List<String>> list = Arrays.asList( Arrays.asList("a"), Arrays.asList("b"));
  System.out.println(list.stream()
    .flatMap(Collection::stream)
.collect(Collectors.toList())); // this will print [a, b]- Observable sequences, or simply Observables, are representations of asynchronous data streams. These are based on the Observer pattern wherein an object called an Observer, subscribes to items emitted by an Observable. The subscription is non-blocking as the Observer stands to react to whatever the Observable will emit in the future.
-
Observable<T>can emit 0 to N events, which is very different than aFuture<T>that only contains one value. - The basic operator just produces an Observable that emits a single generic instance before completing. When we want to get information out of an Observable, we implement an observer interface and then call subscribe on the desired Observable. Ex:
  Observable<String> observable = Observable.just("Hello");
observable.subscribe(s -> System.out.println(s));- There are 3 methods on the observer interface - OnNext, OnCompleted, OnError.
- OnNext is called on our observer each time a new event is published to the attached Observable.
- OnCompleted is called when the sequence of events associated with an Observable is complete, indicating that we should not expect any more onNext calls on our observer
- OnError is called when an unhandled exception is thrown during the RxJava framework code or our event handling code. EX:
  String[] letters = {"a", "b", "c", "d", "e", "f", "g"};
  Observable<String> observable = Observable.from(letters);
  observable.subscribe(
    i -> result += i,  //OnNext
    Throwable::printStackTrace, //OnError
    () -> result += "_Completed" //OnCompleted
  );
assertTrue(result.equals("abcdefg_Completed"));- When an observable returns only one item we can use .from Ex:
  Observable
  .from(new String[] { "John", "Doe" })
.subscribe(name -> System.out.println("Hello " + name))- When an error occurs the OnError method is called and the subscription ends immediately.
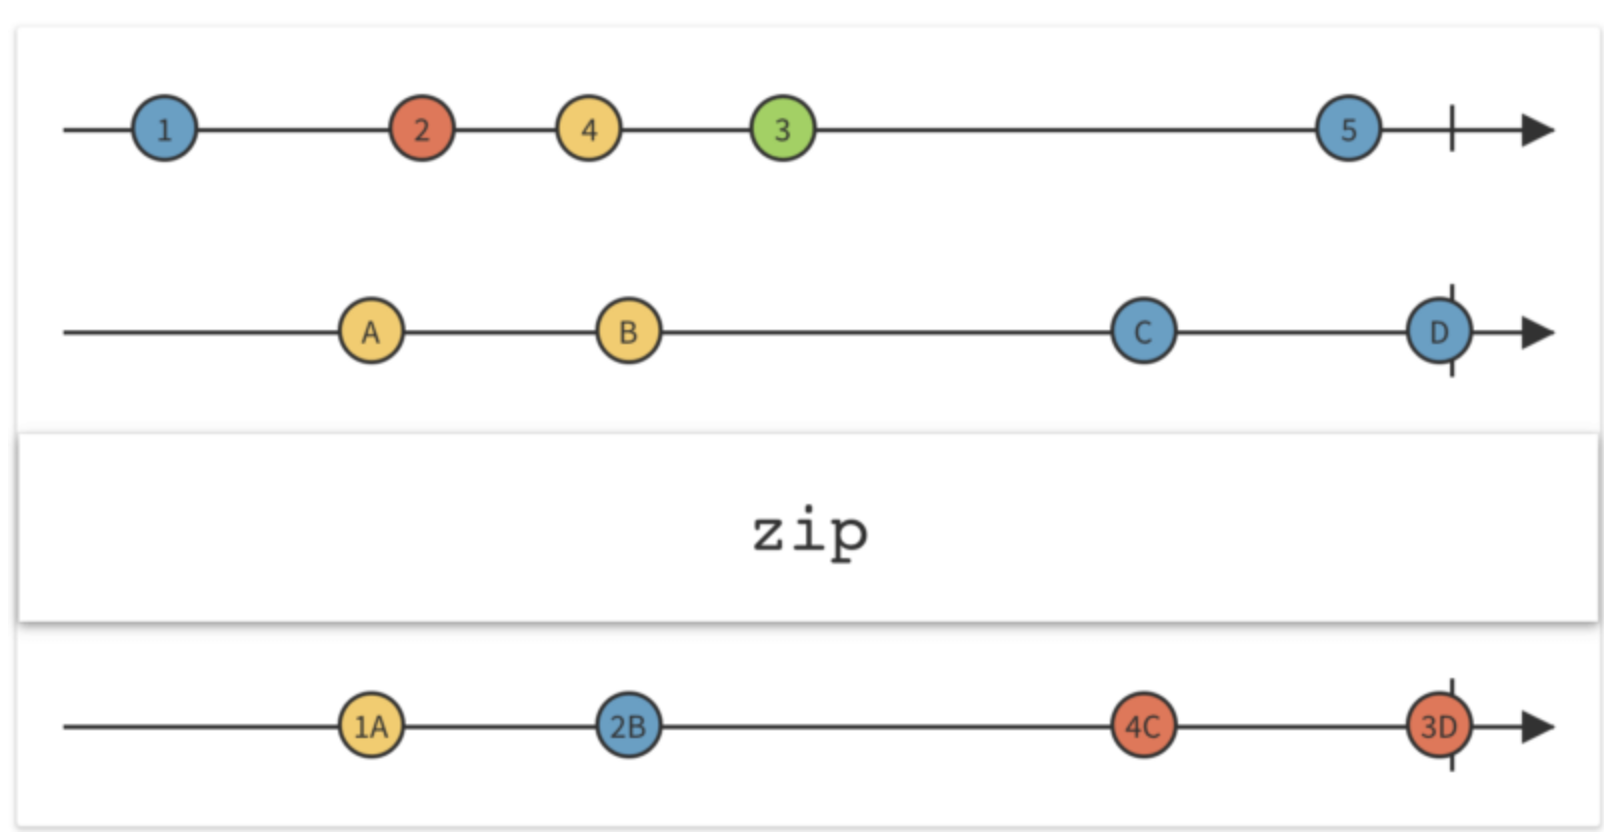
- Observable can be combined from diff sources using Observable.merge - which combines outputs of multiple observables - or Observable.zip - which combines 2 sequence of values as pairs. This is accomplished by passing a function that defines how the pairs should be processed.
- Serialization - an object can be represented as a sequence of bytes that includes the object's data as well as information about the object's type and the types of data stored in the object.
- process is JVM independent, meaning an object can be serialized on one platform and deserialized on an entirely different platform.
- Classes
ObjectInputStreamandObjectOutputStreamare high-level streams that contain the methods for serializing and deserializing an object. The methods are writeObject() for serializing and readObject() for deserializing. - The class to be serialized must implement the java.io.Serializable interface and all of its fields must be serializable or marked as transient ( i.e. transient vars won’t be serialized). Ex:
public transient int SSN; Ex :
 try {
    FileOutputStream fileOut =  new FileOutputStream("/tmp/employee.ser");
    ObjectOutputStream out = new ObjectOutputStream(fileOut);
    out.writeObject(e);   //—> Class to be serialized
    out.close();
    fileOut.close();
    System.out.printf("Serialized data is saved in /tmp/employee.ser");
  } catch (IOException i) {
    i.printStackTrace();
  }
To deserialize:
  try {
    FileInputStream fileIn = new FileInputStream("/tmp/employee.ser");
    ObjectInputStream in = new ObjectInputStream(fileIn);
    e = (Employee) in.readObject();
    in.close();
    fileIn.close();
  } catch (IOException i) {
    i.printStackTrace();
    return;
  } catch (ClassNotFoundException c) {
    System.out.println("Employee class not found");
    c.printStackTrace();
    return;
  }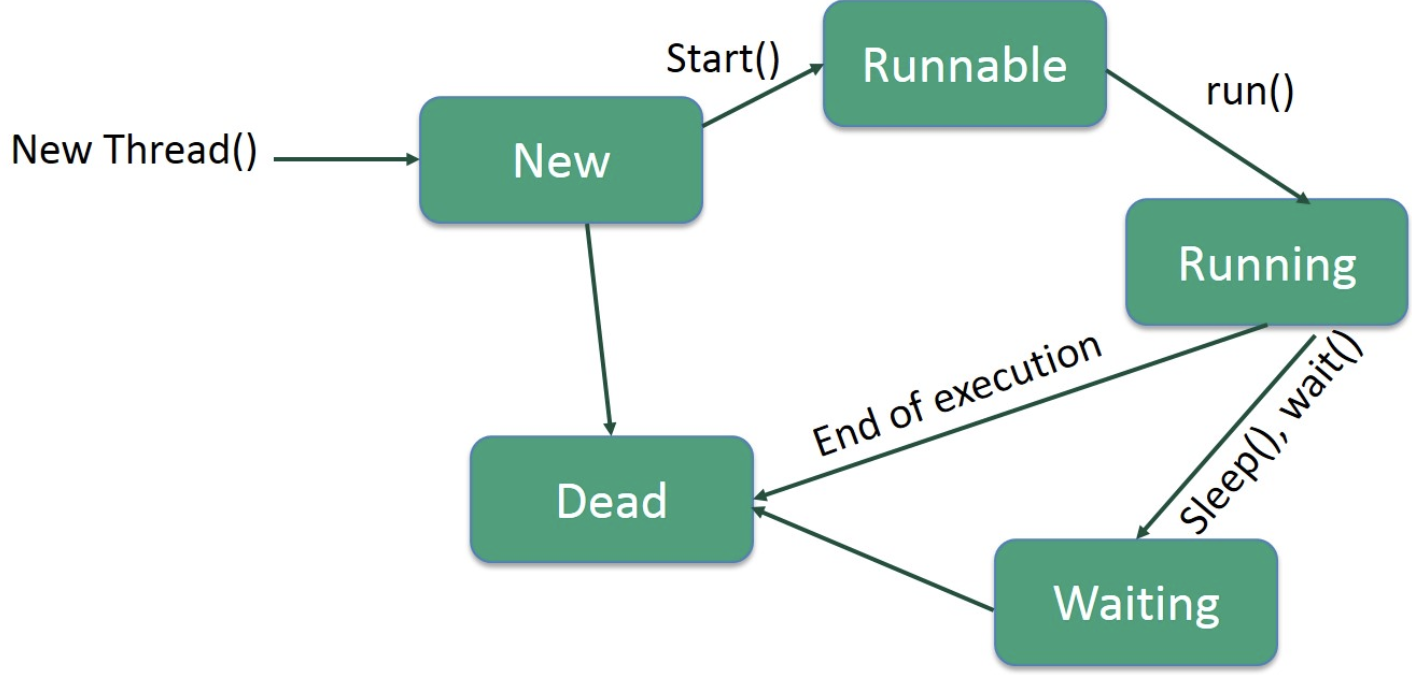
Create a Thread by Implementing a Runnable Interface
- Need to implement a run() method provided by a Runnable interface. This method provides an entry point for the thread and you will put your complete business logic inside this method. Ex.
public void run(); - Instantiate a Thread object using the following constructor −
Thread(Runnable threadObj, String threadName); - Once a Thread object is created, you can start it by calling start() method, which executes a call to run( ) method.
class RunnableDemo implements Runnable {
  private Thread t;
  private String threadName;

  RunnableDemo( String name) {
    threadName = name;
    System.out.println("Creating " +  threadName );
  }

  public void run() {
    System.out.println("Running " +  threadName );
    try {
      for(int i = 4; i > 0; i--) {
      System.out.println("Thread: " + threadName + ", " + i);
      // Let the thread sleep for a while.
      Thread.sleep(50);
      }
    } catch (InterruptedException e) {
      System.out.println("Thread " +  threadName + " interrupted.");
    }
    System.out.println("Thread " +  threadName + " exiting.");
  }

  public void start () {
    System.out.println("Starting " +  threadName );
    if (t == null) {
      t = new Thread (this, threadName);
      t.start ();
    }
  }
}

public class TestThread {

public static void main(String args[]) {
  RunnableDemo R1 = new RunnableDemo( "Thread-1");
  R1.start();

  RunnableDemo R2 = new RunnableDemo( "Thread-2");
  R2.start();
  }
}
Create a Thread by Extending a Thread Class
- This approach provides more flexibility in handling multiple threads created using available methods in Thread class.
- override run( ) method available in Thread class. This method provides an entry point for the thread and you will put your complete business logic inside this method.
- Once Thread object is created, you can start it by calling start() method, which executes a call to run( ) method.
class ThreadDemo extends Thread {
  private Thread t;
  private String threadName;

  ThreadDemo( String name) {
    threadName = name;
    System.out.println("Creating " +  threadName );
  }

  public void run() {
    System.out.println("Running " +  threadName );
    try {
      for(int i = 4; i > 0; i--) {
        System.out.println("Thread: " + threadName + ", " + i);
        // Let the thread sleep for a while.
        Thread.sleep(50);
      }
    } catch (InterruptedException e) {
      System.out.println("Thread " +  threadName + " interrupted.");
    }
    System.out.println("Thread " +  threadName + " exiting.");
  }

  public void start () {
    System.out.println("Starting " +  threadName );
    if (t == null) {
      t = new Thread (this, threadName);
      t.start ();
    }
  }
}

public class TestThread {

  public static void main(String args[]) {
      ThreadDemo T1 = new ThreadDemo( "Thread-1");
      T1.start();

      ThreadDemo T2 = new ThreadDemo( "Thread-2");
      T2.start();
    }
}
A simpler approach using Lambda
Below example creates a new thread using a lambda function i.e whatever needs to be executed in the new thread separately is packaged as a lambda and passed.
public class Democlass {
  public static void main(String[] args) {
    Thread lambdaThread = new Thread( () -> System.out.println(“Thread thru a lambda”));
    lambdaThread.run();
  }
}In a multi-threaded environment, a race condition occurs when two or more threads attempt to update mutable shared data at the same time. Java offers a mechanism to avoid race conditions by synchronizing thread access to shared data. A piece of logic marked with synchronized becomes a synchronized block, allowing only one thread to execute at any given time. Ex
public synchronized void calculate() {
  setSum(getSum() + 1);
}-
Volatilekeyword is used to mark a Java variable as "being stored in main memory". More precisely that means, that every read/write of a volatile variable will be read/written from/to the computer's main memory, and not from the CPU cache - The Java volatile keyword guarantees visibility of changes to variables across threads.
- JVM maintains Stack and a heap to hold data elements in memory.
- Stack is similar to a program stack in other languages and instead of maintaining the executable statement, it maintains the variables as it executes each line within a program’s scope. However if a block completes executing then all vars in the stack corresponding to that block are popped. Because of this blocked scope elements are not accessible outside the block
- Stack also stores only primitive data elements like int, double etc. and not non-primitive ones like String, Integer and Objects.
- Non-primitive types are stored on a heap which is a large storage area.
- Unlike stack, elements are not immediately cleared after block scope but instead elements are marked as GC eligible.
- Objects that are not reachable from the stack are marked as GC eligible and JVM controls when GC runs.
- Strings are immutable. I.e. if we assign a new string value to a var a new string obj is created and assigned to the var and the old one is marked as GC eligible.
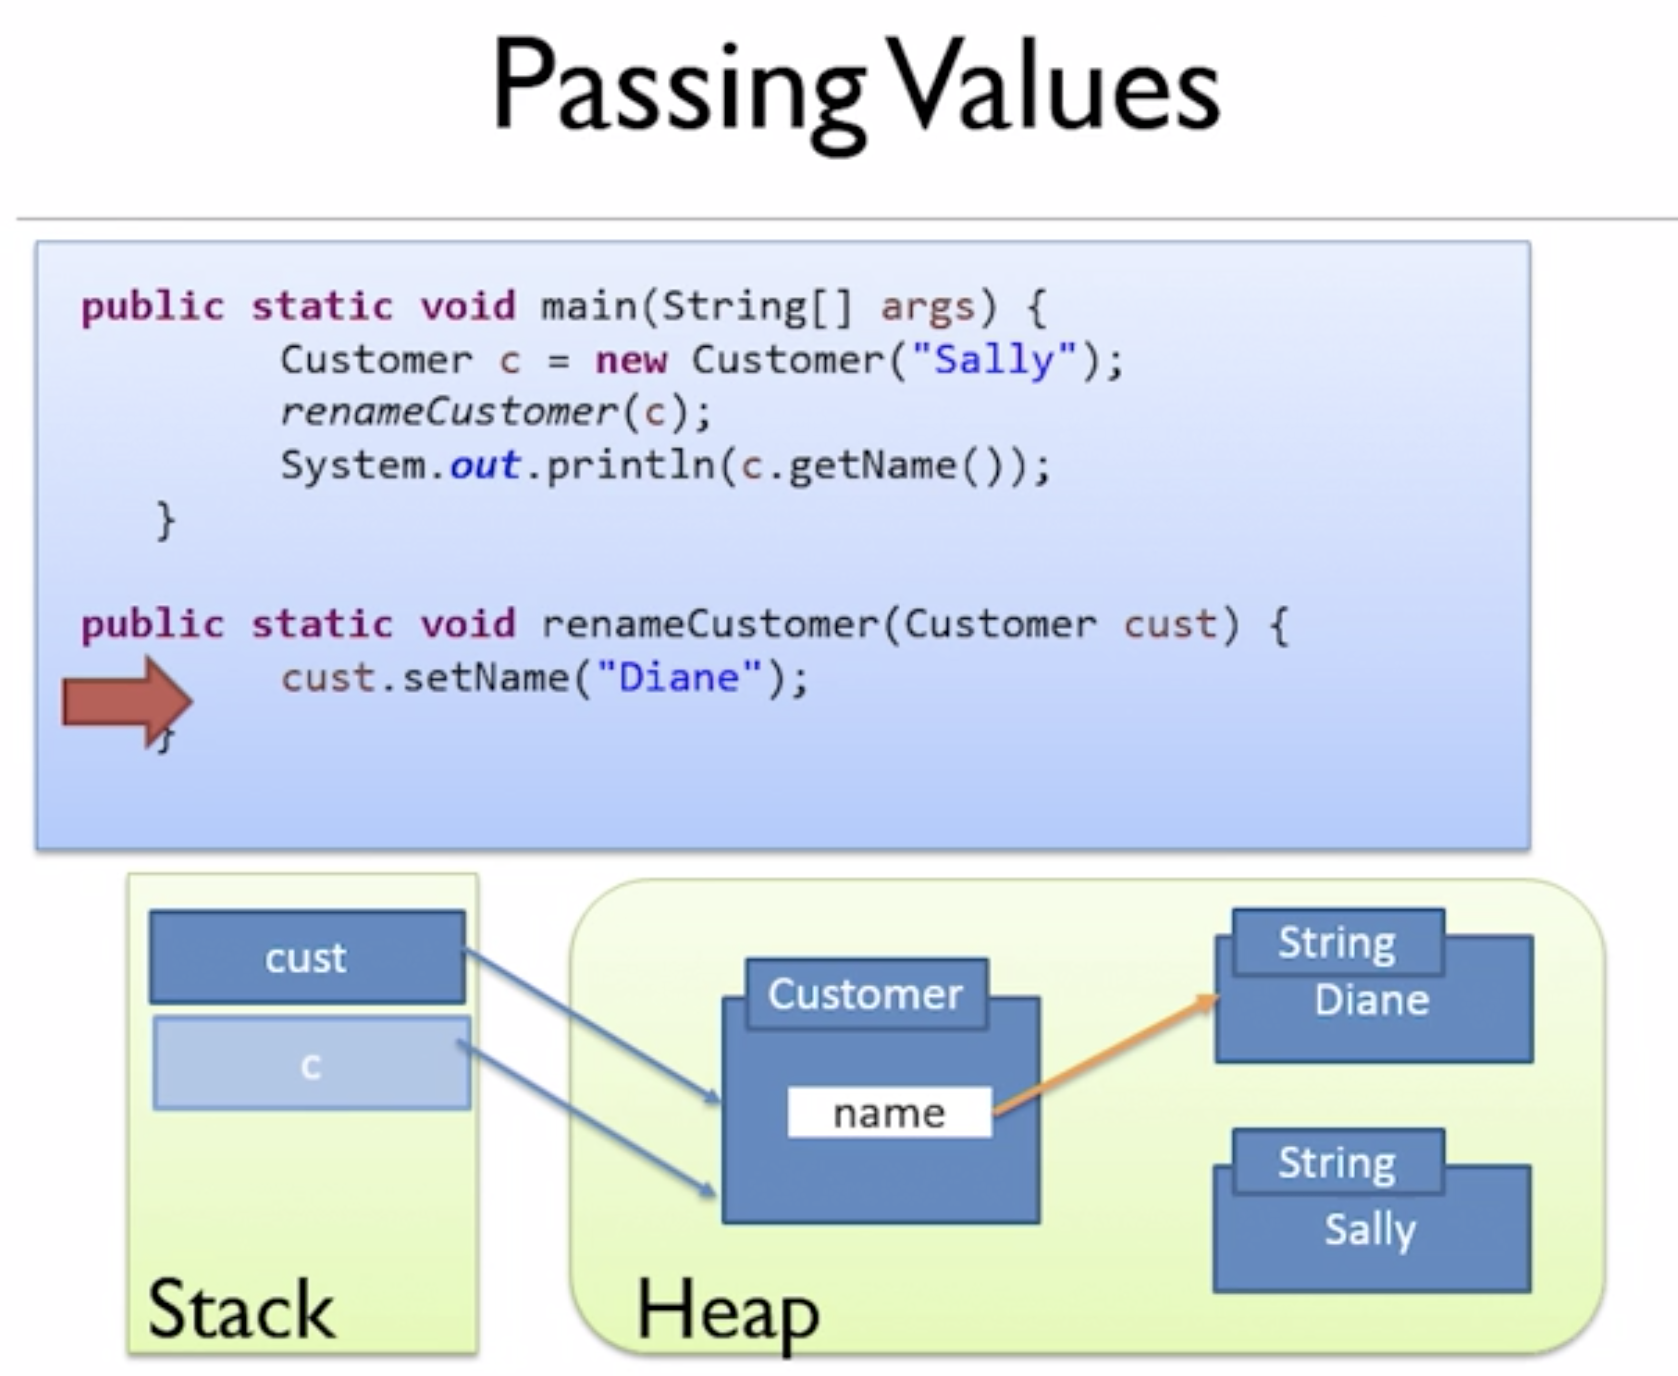
- In Java objects are passed by value i.e. the reference to the obj is passed by value.
- The final keyword is used to ensure variables are not reassigned. However, we can still define a var as final and not initialize it straightway and assign it later (but only once). We can also change the properties of a class that is referenced by a final variable reference. Ex:
final Customer c = new Customer(“Man”); c.setName(“new”)—> this is valid - Escaping References or Escaping encapsulation -
- If we have a class that returns pointers to its object then it is an escaping reference as the caller can mutate the object.
- A way to avoid this would be to pass a copy of the object, like a Read only copy
- Or use immutable collections. Ex. Collections.unmodifyableMap
- String pools - When multiple string vars refer to the same string object, Java just creates multiple references to the same str obj instead of diff str objs as Strings are immutable.
- The gc() method can be used to prompt JVM to run gc however there is no guarantee as to when gc will run.
- The finalize() method runs on an object when the obj is gc’ed. So if we want to perform operation at the time of gc we can add this method to our class. However its not recommended
- Soft leaks - an obj ref on stack even though it will never be used
- GC usually uses a Mark and sweep approach i.e. Instead of checking which obj are gc eligible it first marks all objs that are alive and not eligible (this is easy since jvm just needs to look at the stack and find references)and then in a single sweep removes all objs that are not alive.
- When GC runs JVM needs to stop all running threads. Since this may not be acceptable, heap is generally divided into different areas that are GC separately. Usually there is a young, old and Metaspace areas.
- Strings are immutable. They are stored as byte array starting with the newer versions.
- One of the other way of creating a string is using a string object. Ex: String a = new String(“ABC”); This is not recommended
- Strings can be mutated using StringBuilder or StringBuffer classes. The latter is thread safe. EX:
StringBuilder str = new StringBuilder(“abc”);
str.append(“def”);
str.insert(3,”AAA”);
Str.delete(1,3);- Way of creating applications as a set of modules (each with their own set of packages) that can be deployed independently
- From IDE just create a new module and then packages & classes within it.
- Modules will have a ‘module-info.java’ file in which we need to include dependent modules using the ‘requires’ statement. Similarly the packages to be exposed are declared there using ‘exports’ statement.
- This way we can control which packages are available to which modules.
- While package access can be controlled by other ways using modules make it easier.

Spring Boot Features
- Auto-config - contextually aware. Ex: it can automatically add DB config if it sees a DB in the dependency. To enable just add annotation @EnableAutoConfiguration
- Standalone - Doesn’t need any server (like Apache, tomcat etc). Has an embedded server. So can be directly run from the app server and it will automatically start its own webserver.
- Opinionated - Has a way of doing things a certain way by default
Key areas
- Core
- Webflux - reactive flow
- AOP - Aspect oriented programming
- Data access - @Transactional
- Integration - @RestController, @GetMapping(“/account/{id}”), @PathVariable. For rest we can also use restTemplate. Ex:
restTemplate.getForObject(“http://foo.com/account/123”, Account.class); - Testing - has built in mocks and easy dependency injection
Projects Spring Data - provides easy programming model for data access and enables access to many different data types and DBs whereas ‘Data access’ only provides access to RDBMS. Spring Cloud - Built on top of spring boot. Enables building cloud based apps such as microservices Spring Security - Provides authN & authZ
Spring Architecture
- A spring app (specifically Spring MVC) is structured with 3 components: Controllers -> Services -> Repository.
- Controllers handle service request/responses, views and routing (@Controller annotation). Services (@Service) handle business logic and interaction with repository and repository (@Repository) handle the DB interaction.
Spring REST Controller
- Use @RestController annotation to tell Spring that this class is special and will respond to requests.
  @RestController
  public class BookController {
}- In the controller you will create methods that can be accessed by a specific path and request method. If you know all of your endpoints are going to have the same base path, you can create that path at the class level using the @RequestMapping annotation. Ex:
  @RestController
  @RequestMapping("/books")
  public class BookController {
}- Next, to handle GET requests we would need to define a method that handles it. We would then identify this method as the request handler by adding the annotation @GetMapping
  @GetMapping
  Public List<String> list() {
    return books;
}- For post mapping, we can add the @PostMapping annotation and additionally we would need to use the @RequestBody annotation to map the request body to the method argument. Since the request body would be JSON we are mapping it to a Map. For example
  @PostMapping
  public void createBook(@RequestBody Map<String, String> payload) {
    books.add(payload.get(“title));
}- Similarly, we can define methods to handle PUT and DELETE methods and designate them by adding the @PutMapping and @DeleteMapping annotations.
- Additionally, we can use @RequestParam annotation similar to @RequestBody to define the parameters that are sent as request params in Delete or GET requests. Ex: public void delete(@RequestParam String title) … The param should now be sent as /books?title=spring. Here spring would get mapped to argument title.
- @PathVariable
JPA - Java Persistance API
- The JPA specification lets you define which objects should be persisted, and how those objects should be persisted. They basically provides some kind of ORM layer.
- Object Relational Mapping or ORM is responsible for managing the conversion of software objects to interact with the tables and columns in a relational database.
- By default, the name of the object being persisted becomes the name of the table, and fields become columns.
- In JDBC, when you write each query, you need to include all the details required for CRUD operations, such as table names, column names. In JPA (which uses JDBC "under the hood"), you also specify this data, but only once, when annotating a Java class.
- JPA is not a tool or framework; rather, it defines a set of concepts that can be implemented by any tool or framework.
- Hibernate ORM is one of the most mature JPA implementations. Other examples are EclipseLink, Spring Data JPA etc.
- By default, Spring Data JPA uses Hibernate as the ORM provider (to execute queries).
- Traditional approach to persist data in DB was to use plain JDBC and prepared statements to execute sql queries directly on the DB. With JPAs, the conversion of Java objects to equivalent queries are handled by the JPA.
- With JPA an object can be saved to DB with just a simple command like musicanManager.save(objname);
- In order to achieve this the JPA needs to be defined and use annotations to inform JPA which objects should be persisted, and how they should be persisted.
- Attaching @Entity to a class informs JPA that this class and its objects should be persisted. Similarly @Id annotation designates a field as the primary key.
- CRUD operations can then be carried out by executing the appropriate methods on the JPA class like save(), remove() etc.
- In addition to the above we also need to setup JPA repositories. For this we simply define interfaces for each JPA by extending the ‘JpaRepository’ EX: Public interface SpeakerRepository extends JpaRepository<Speaker, Long> {} //Long is the type of the primary key
Spring Configs
- Use application-properties file under resources folder. Another option is to use application.yml file and use yaml format. Ex:
  server:
port: 5000- In this file we can replace hardcoded values with env variables as ${env_var}. Then pass env_var during run. For IntelliJ use Env var under Edit config
- To set config for diff env we simple create diff properties files as application-prod.properties. Then while running set the env at runtime by passing the JVM option:
-Dspring.profiles.active=prod(Use VM option within edit config in IntelliJ) - To access config files in code, use the @Value annotation. Ex:
  @Value(“${app.version}”)
  private string appVersion;`   // the value of env variable will be assigned to this appVersion variable
Deploying App
- Spring comes bundled by default with Tomcat container that will run the app. This default can be changed by using the ‘exclusion’ tag within the Spring starter dependency and adding the dependency for the desired container
- To bundle the app as a deployable package, use “mvn package” command. This will create the JAR in target folder that can be run from anywhere with a “java -jar ” .
- This can be made an executable by adding the “executable” tag in the POM.